For those of you reading my blog that haven't figured it out by now, I like miniatures. I like building models. Miniature wargames give me an excuse to build and paint models ('regular' model kits, while cool and fun to build, just end up sitting on a shelf until they inevitably get broken (my dad used to build sailing ship models - and all of them eventually were destroyed in some accident or another). (On his birthday after he passed, I was at the Hobby Shop and almost bought the USS Constitution model they had there because I remember him building it when I was a kid. At times I still think I should make it - but I have no place to display it, and know that after it was done it would just gather dust until it was destroyed). (Of course, maybe the joy is in the making, not the having). (Ok, I'm waaaayyyy off topic!)

Reaper Minis out of Denton Texas is a manufacturer of tons (that is probably literal (or was), as until a few years ago all their minis were metal)). It surprised me looking them up on wikipedia that they have only been around since 1992 - I guess some of the few minis I bought as a teenager must have been Ral Partha and not Reaper as I mis-remember them (yes, 27 years old feels young to me (honestly, half my kids are older than that!).
One of the interesting things they choose to do a few years back was to convert their line from metal to plastic - and so they did the first Bones kickstarter back in 2012 (Reaper Bones V is supposed to go in October I believe). I jumped on this simply because I felt I would regret NOT doing it - the models were less than a buck a piece (much less), and I figured while I didn't have a direct use for them, my kids might be able to use them for Role Playing or other stuff. Since then I have done all their Bones kickstarters, and have a large box of bones minis - which I do find some occasional uses for.

On some of these campaigns, I do get certain specific extra models. One of my favorites was the new version of "Dragons Don't Share" - I remember seeing the original metal version at a game store a long time ago, and so had to get the new bones one.

The dragon is (still unpainted) sitting on my desk - but the castle has seen a LOT of use for wargaming terrain at Origins and Gencon (I do wish they would actually make more terrain - that is by far my favorite of all the bones models I have).
With the Bones IV kickstarter, there were a couple of terrain items I picked up. I do plan on showing all of them eventually (I actually still haven't gone through my box with the base pledge yet). I anticipated that Baba Yaga's hut would be a bit to put together - but it came pre-assembled. So it was the Stygian Barge that is the most complex Reaper model I've yet gotten.


I also got the fantasy scenics

And tree of despair to use as scenery.

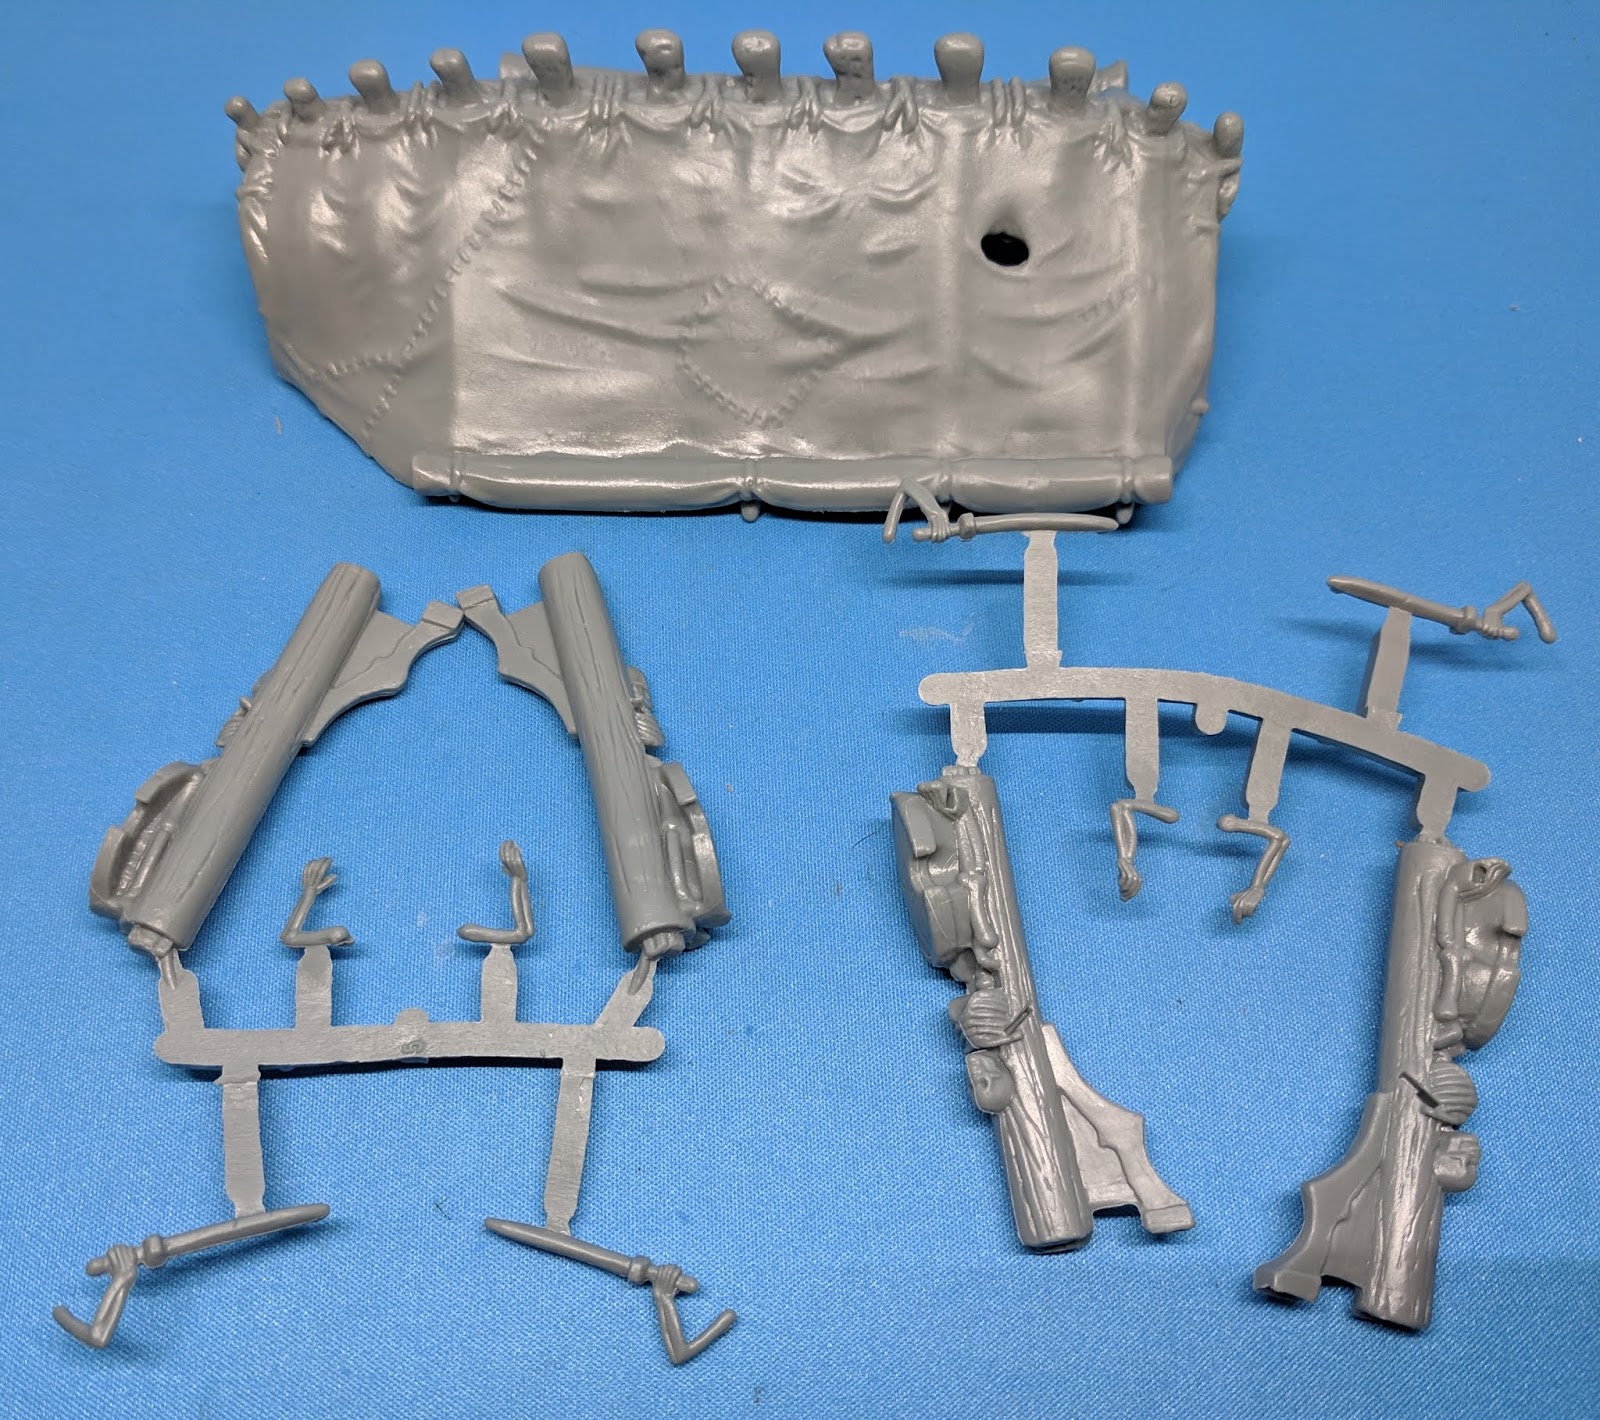
The ship (not including the translucent crew/passengers that came with it) was 52 pieces, and of course, no instructions. (but if it had, what would I have to write about on a Sunday afternoon?)


The ghosts crew are pretty cool - I like when manufacturers make translucent minis for ghosts


It turns out there are some rather tricky parts to this as well.
It basically is three section - fore, mid-ship and aft.
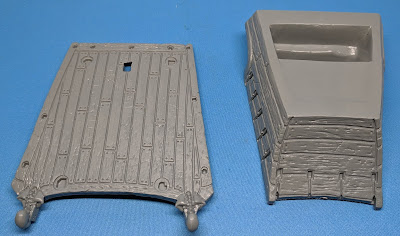
The main part of the fore section is simple


The forward hold fits into the fore hull easily. There is a bit of a gap - it depends on how you want to use it if it will matter to you or not.
There are then a few more detail pieces as well.

The first is the cover for the hold. This isn't a piece I wanted to glue on, as the flooded hold has a lot of detail that this will completely cover up.


Then there is the coil of rope for the anchor - that fits in the groove specifically made for it.


There is also a piece of rope - this is where the anchor will be connected. It is easier to see where it goes if you turn the hull over.


There is a tab on the end of the rope that fits in the hull. The other end will be attached to the anchor (and you can glue it later IF you are going to glue the three pieces together).


The figurehead is only five pieces, but it is much trickier to assemble than it looks at first glance.

There is a tab on the bottom of the spine that fits into the tail. It is 'keyed' - but I've found that small 'keyed' pieces don't always help in guaranteeing positioning, especially with softer material like bones.

The skull then fit on the top of the spine

The goblet fits in a small hole in the right wrist.


The arm with the lantern then fits in a socket in the left shoulder.


There is a small tab in the lower back, and one on the back of the tail flipper. There then fit in the front of the hull.


I really like this figurehead - the flying skeletal mermaid is just cool to me.


If (I should say when, but let's be real here folks :-) ) I get this painted up this definitely deserves some object source lighting effects for the lantern. (Of course with the wood texture, it may be real easy to get most of this done with contrast paints).


The midship basically just has a few details to assemble.


The water barrel has a separate bottom, that is keyed and fits easily. Now why a barge for the dead needs a barrel for fresh water is a bit of a mystery, but we'll just go with it.

It then has slots to fit the pegs on the side of the mid-section


The mast is also keyed, and fits easily.


The skull at the top looks odd, until you realize there it is missing the horns.

Once these are added, it is a 'classic' ram skull


The anchor is the tricky part here. There are gabs on the anchor, and notches in the hull for it, but it isn't quite that simple, and it took me a couple of tries to get it together.

There is also a section of rope that is needed. The loops around one of the 'teeth', and it actually fits one of the notches on the hull that I first thought was for the anchor.


The two ends of the rope attach to the anchor


Then the tabs here attach to the hull, and the loop goes over the tooth


This one actually needed to be clamped into place to glue. Bones material is soft and pliant, so it made it a bit easier, but the pieces did not want to stay initially. Another solution would be to put them in hot water for a minute and then fit them in place and let them reset.

The end of the anchor fits in the rope from the fore section when the top parts are put together. Each hull section has a long tongue and groove connection to fit together.


IF you are going to glue the three hull pieces together (it is a very long model, so depending on what you are using it for you may not want to) then you can glue the end of the anchor into the rope as well.


Then the aft section. The hull and the deck easily fit together.


Then comes the railing, rudder and supports.


When the hull is upside down and attached to the deck, you can see the notches where the supports go. Pay attention to the way the notches are keyed, as it helps to get the supports in the correct orientation.


The rudder is assembled by pushing it up from underneath the deck.


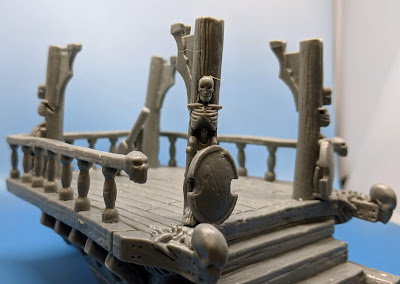
Then come the railings (as you wouldn't want any of the dead to fall off the boat, would we. They could be killed!)

The three railing pieces are all keyed to the holes in the deck. In addition, each of the longer side rails has a notch to fit the top of the back rail. Again the flexibility of the bones material helps to maneuver these into place.


Then comes the canopy. I probably did this wrong, and should have assembled the canopy poles first, then attached them, then the rails on the outside (I did it in the complete opposite order). But then I am good at being an example of what not to do! I make the mistakes so you don't have to!


Each of the four canopy support poles is keyed to a specific slot in the deck. This makes sure the skeletal guards are facing the correct way.


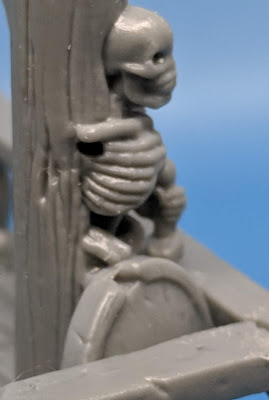
It is interesting that there are both left and right handed skeletons - to keep the look symmetrical.


There is a slot near the outer shoulder (left or right depends on which one) of the skeletal guard on the support pole. In addition there is another small slot in the foot of the same side (I did not notice this until after gluing the poles to the deck. The nub on the tip of the sword fits in this foot slot, while the bigger tab on the arm goes near the shoulder.


There is a smaller slot just below the 'inner' shoulder, and a small notch in the shield. The slot is for the arm, and the notch is for the corresponding tab on the hand.


The canopy has four pairs of tabs on the underside that fit in the tops of the support poles. Once again having the bones material be a bit soft makes it easier to get all these to fit in at the same time. I'm not gluing the canopy on until after ti is painted however.


The three main assemblies fit easily together now, to make one huge model ( " long). I'm not sure how I want to use this yet - one idea would be for multibasing - use each section as the base for a unit of a water themed undead army. Or have it just as scenery (as originally planned before I found out how damn big it was) for a wargame table.


I had also thought of having it as a shipwreck on the sand (I like the idea of one in the desert where the USED to be an ocean), but I don't think it will fit that well. (I did buy a GW Gloomtide Shipwreck for that purpose - it isn't painted either yet). Kara uses it as a two bases in her Trident Realm army.
Because it is all fun and games

Reaper Minis out of Denton Texas is a manufacturer of tons (that is probably literal (or was), as until a few years ago all their minis were metal)). It surprised me looking them up on wikipedia that they have only been around since 1992 - I guess some of the few minis I bought as a teenager must have been Ral Partha and not Reaper as I mis-remember them (yes, 27 years old feels young to me (honestly, half my kids are older than that!).
One of the interesting things they choose to do a few years back was to convert their line from metal to plastic - and so they did the first Bones kickstarter back in 2012 (Reaper Bones V is supposed to go in October I believe). I jumped on this simply because I felt I would regret NOT doing it - the models were less than a buck a piece (much less), and I figured while I didn't have a direct use for them, my kids might be able to use them for Role Playing or other stuff. Since then I have done all their Bones kickstarters, and have a large box of bones minis - which I do find some occasional uses for.

On some of these campaigns, I do get certain specific extra models. One of my favorites was the new version of "Dragons Don't Share" - I remember seeing the original metal version at a game store a long time ago, and so had to get the new bones one.

The dragon is (still unpainted) sitting on my desk - but the castle has seen a LOT of use for wargaming terrain at Origins and Gencon (I do wish they would actually make more terrain - that is by far my favorite of all the bones models I have).
With the Bones IV kickstarter, there were a couple of terrain items I picked up. I do plan on showing all of them eventually (I actually still haven't gone through my box with the base pledge yet). I anticipated that Baba Yaga's hut would be a bit to put together - but it came pre-assembled. So it was the Stygian Barge that is the most complex Reaper model I've yet gotten.


I also got the fantasy scenics

And tree of despair to use as scenery.

The ship (not including the translucent crew/passengers that came with it) was 52 pieces, and of course, no instructions. (but if it had, what would I have to write about on a Sunday afternoon?)


The ghosts crew are pretty cool - I like when manufacturers make translucent minis for ghosts


It turns out there are some rather tricky parts to this as well.
It basically is three section - fore, mid-ship and aft.
The main part of the fore section is simple


The forward hold fits into the fore hull easily. There is a bit of a gap - it depends on how you want to use it if it will matter to you or not.

The first is the cover for the hold. This isn't a piece I wanted to glue on, as the flooded hold has a lot of detail that this will completely cover up.


Then there is the coil of rope for the anchor - that fits in the groove specifically made for it.


There is also a piece of rope - this is where the anchor will be connected. It is easier to see where it goes if you turn the hull over.


There is a tab on the end of the rope that fits in the hull. The other end will be attached to the anchor (and you can glue it later IF you are going to glue the three pieces together).


The figurehead is only five pieces, but it is much trickier to assemble than it looks at first glance.

There is a tab on the bottom of the spine that fits into the tail. It is 'keyed' - but I've found that small 'keyed' pieces don't always help in guaranteeing positioning, especially with softer material like bones.

The skull then fit on the top of the spine

The goblet fits in a small hole in the right wrist.


The arm with the lantern then fits in a socket in the left shoulder.


There is a small tab in the lower back, and one on the back of the tail flipper. There then fit in the front of the hull.


I really like this figurehead - the flying skeletal mermaid is just cool to me.


If (I should say when, but let's be real here folks :-) ) I get this painted up this definitely deserves some object source lighting effects for the lantern. (Of course with the wood texture, it may be real easy to get most of this done with contrast paints).


The midship basically just has a few details to assemble.


The water barrel has a separate bottom, that is keyed and fits easily. Now why a barge for the dead needs a barrel for fresh water is a bit of a mystery, but we'll just go with it.

It then has slots to fit the pegs on the side of the mid-section


The mast is also keyed, and fits easily.


The skull at the top looks odd, until you realize there it is missing the horns.

Once these are added, it is a 'classic' ram skull


The anchor is the tricky part here. There are gabs on the anchor, and notches in the hull for it, but it isn't quite that simple, and it took me a couple of tries to get it together.

There is also a section of rope that is needed. The loops around one of the 'teeth', and it actually fits one of the notches on the hull that I first thought was for the anchor.


The two ends of the rope attach to the anchor


Then the tabs here attach to the hull, and the loop goes over the tooth


This one actually needed to be clamped into place to glue. Bones material is soft and pliant, so it made it a bit easier, but the pieces did not want to stay initially. Another solution would be to put them in hot water for a minute and then fit them in place and let them reset.

The end of the anchor fits in the rope from the fore section when the top parts are put together. Each hull section has a long tongue and groove connection to fit together.


IF you are going to glue the three hull pieces together (it is a very long model, so depending on what you are using it for you may not want to) then you can glue the end of the anchor into the rope as well.


Then the aft section. The hull and the deck easily fit together.


Then comes the railing, rudder and supports.


When the hull is upside down and attached to the deck, you can see the notches where the supports go. Pay attention to the way the notches are keyed, as it helps to get the supports in the correct orientation.


The rudder is assembled by pushing it up from underneath the deck.


Then come the railings (as you wouldn't want any of the dead to fall off the boat, would we. They could be killed!)

The three railing pieces are all keyed to the holes in the deck. In addition, each of the longer side rails has a notch to fit the top of the back rail. Again the flexibility of the bones material helps to maneuver these into place.


Then comes the canopy. I probably did this wrong, and should have assembled the canopy poles first, then attached them, then the rails on the outside (I did it in the complete opposite order). But then I am good at being an example of what not to do! I make the mistakes so you don't have to!

Each of the four canopy support poles is keyed to a specific slot in the deck. This makes sure the skeletal guards are facing the correct way.


It is interesting that there are both left and right handed skeletons - to keep the look symmetrical.


There is a slot near the outer shoulder (left or right depends on which one) of the skeletal guard on the support pole. In addition there is another small slot in the foot of the same side (I did not notice this until after gluing the poles to the deck. The nub on the tip of the sword fits in this foot slot, while the bigger tab on the arm goes near the shoulder.


There is a smaller slot just below the 'inner' shoulder, and a small notch in the shield. The slot is for the arm, and the notch is for the corresponding tab on the hand.


The canopy has four pairs of tabs on the underside that fit in the tops of the support poles. Once again having the bones material be a bit soft makes it easier to get all these to fit in at the same time. I'm not gluing the canopy on until after ti is painted however.


The three main assemblies fit easily together now, to make one huge model ( " long). I'm not sure how I want to use this yet - one idea would be for multibasing - use each section as the base for a unit of a water themed undead army. Or have it just as scenery (as originally planned before I found out how damn big it was) for a wargame table.


I had also thought of having it as a shipwreck on the sand (I like the idea of one in the desert where the USED to be an ocean), but I don't think it will fit that well. (I did buy a GW Gloomtide Shipwreck for that purpose - it isn't painted either yet). Kara uses it as a two bases in her Trident Realm army.
Because it is all fun and games
Hum... I'm almost certain the baba yaga hut design was already sold by another vendor since a few years. Strange to see it being part of a kickstarter now...
ReplyDelete