Mantic had a little contest for the North American Patfinders to get us to create demo boards for the upcoming Vanguard releases. We had to wait a bit to be able to post anything about them, but that doesn't mean I haven't documented what I've been doing.
Initially it was to be 3 x 3 feet, but then Martin said we could actually do 2 x 2 for demos (which is MUCH easier to transport), so that is what I went with (because for anything else, I plan on using neoprene mats to keep things variable (I added one in my kickstarter pledge even).
First step was a quick trip to home depot, were it was easy enough to pick up a 2 x 2 piece of plywood, and they even had 2 x 2 sheets of pink insulation foam. I figured I wanted to go big, so I wanted depth to the board (for a river).
I started by laying out existing terrain to get an idea of what I wanted. Of course, things change once I actually start building it, but it is a rough guide.
I figured I'd base it on a simple farm. Field in the top left, with a road going through the middle (with a turn in it) which has a bridge over a stream. Two small houses, some fencing around the field, a small set of fruit trees/bushes behind one house and a small orchard.

I had actually picked up two small 4Ground houses at Gencon, so I put them together quickly to get a better feel for the board with more 3D elements to it. I am not gluing these to the board to keep it easier to transport, but will leave specific places for them.


I then took my Hot Wire Foam Factory tools to go for the pink foam board. The foam knife did the large shapes (i.e. cutting out the river), while the wire shaper was used to trim up the edges.
After cutting out the river I then adjusted everything to fit it (and ended up switching the crossroad.

A couple of years ago I kickstarted a project for textured foam sheets with the plan to use them to make some buildings (like a church or other appropriate stone building). In my pledge, I swapped two of the regular stone sheets for cobblestone sheets (these were two sides, with the back being flagstones). So while I've got a big box of blue foam squares sitting in my basement, the cobblestones seemed perfect for the road. (You can now buy these from their website Firedragon Games)

I marked the back evenly, and then cut out the roads again using my foam knife.

I checked the placement of these, and put down some large craft sticks (ok, tongue depressors) which I had bought many, many years ago (when I was making my WFB orc fortress) for the bridge.

The next step was to add the hills, so I made some rough sketches on the second piece of foam I had picked up, cut and trimmed them. Then glued all the foam down to the board.
While I was waiting for this to dry, I built a bridge. My first attempt was just a bit too short in the end, so I made a second, this time staggering the sticks (which would be more realistic anyway). When the foam was dry, I drilled a few holes to add the supports (cut out of dowel) for the bridge. These also help as they show the exact placement of the bridge even though it isn't glued on yet.
You can also see where I blocked out the other features. The two houses, hedges and fence posts were all marked (the fences and hedges (wasn't that an old cigarette brand?) are all from Mantic's terrain crate. I also marked an area for the orchard (and full disclosure, it became an orchard instead of just plain woods only after I started writing this up, with the board just about the current state). I need to mark that area, because I want the trees to be removable. My initial thoughts are to make them magnetic, so I glued a piece of tin to the board for them.
Also, in the upper left you can see the field marked - I have seen some "rubber" fields and liked the idea of somewhat freshly plowed fields for some difficult terrain, so I made lines for the the furrows in the field. I then glued sand on the lines to raise them. Of course I forgot to take a picture that :-)
I painted thinned PVA glue over all the 'ground' areas, and covered it with sand. This both gives the ground texture as well as protects the insulation foam if you choose to spray paint it.

After that set overnight, I dumped the excess sand off. I then went back and redid a few missing spots, specifically where it was thin on the riverbed (because I want to use Vallejo Still Water for the river, so I am not painting it (to have the stream have a 'rocky' bottom)), as well as putting a thick line of glue on the edges of each road to build up the dirt next to it and hide the edge.

There are some blank spaces for the houses and hedges, and you can see where the metal plate for the magnetic trees is, but those are intentional. Also if you look carefully in the top left corner, you can see the furrows for the field (as well as the blank spaces where the Terrain Crate fence is going (I was going to link to it, but it isn't available yet (unless you bought it through the kickstarter)).
Once all the sand was dried, I started painting the board. I started off airbrushing it just to see how it would go. The road and forest spot were airbrushed black, and a couple of the furrows (with what I had left in my airbrush). Then everything else was given a coat of brown. I am NOT painting the sand at the bottom of the river as I like the way it looks.

I then used the airbrush to try some highlighting, with grey on the road, some dark yellow on the top of the furrows in the field, as well as a bit on the rest of the ground. While this worked well on the furrows, it didn't work for highlighting. I also airbrushed the bridge brown, as well as did a bit of brown on the bottom of the houses to represent just some dirt on them.

Part of the problem was my airbrush stopped working. I disassembled it and put it together again, and now it seems to be working as expected again, so I may yet be able to get away with some some airbrushing.
However I fell back to old fashioned dry brushing of grey on the road to make it come out more. I then added some dirt tracks where some people has used the road.
Next I added tufts from Huge Minis (that I got in their kickstarter) to the raised furrows in the field. This used up all I had of one color and half of another, so it looks like I need to be ordering more. I also added some in the river to represent river plants, as well as a few bit of flock. Some small rocks from the back yard were also added to break it up a bit.

I used some Vallejo water effects gel to block up the ends of the stream, then poured in their still water effects. This is liquid that dries clear and looks great. However it takes forever to dry. The gel will dry to clear, but it takes even longer (48 hours so far, and still cloudy).

Even though I only did a mm or so of water, it still cracked around several of the rocks. I added a thin second coat to it which should both fill in the cracks and add a little depth. Ideally I would like the river to be about a half inch deep, but it takes almost an entire bottle of the water effects to do about 1/8" or so - so that isn't happening for a demo board :-).
Next was flocking the field areas. I got fairly busy and didn't get more in progress shots unfortunately. I added the grass to the open areas, though leaving the banks of the water clear. Then I glued down some clump foliage to break up the space on the hills. I tried to use some old Woodland Scenics scenic glue, but it wasn't holding (you can see some discoloration that should go away after is dries completely). I ended up hot-gluing the clumps down.
Meanwhile, I painted up the hedges from my Terrain Crate kickstarter, as well as the fences. I re-based some trees onto 40mm round magnetic bases, and added some "fruit" to them. (I tried doing that for the hedges, but it just didn't look good). I also pulled out a piece of scatter terrain (woodpile) that I had from THMiniatures first kickstarter. I have a few other pieces , but I while I want plenty of terrain, I also don't want it over crowded.
At this point it is basically done. I plan to demo it with forces on either side of the road, giving some open space in the center, but plenty of cover and interesting stuff to move around.


For now (at least), I'm not attaching the trees, buildings, hedges, fences or woodpile. This is to make it easier to transport. I'm also not gluing on the roofs of the houses, since, being a skirmish game, it is valid for models to enter the houses. The trees, of course, need to be able to be moved out of the wooded when moving figures through it.

At this point I think I'm basically done. I still need to seal the whole thing to make it more durable, as well as do something with the edges to make them more durable (maybe glue felt on them?) Of course I have to wait for the water to dry clear before I can do that as well.
Now to just (impatiently) wait for my kickstarter to arrive so I can paint up warbands and actually begin demoing the new game. Plus I plan to start running "Learn to play" sessions at conventions next year as well (these on full 3x3 mats as opposed to a 2x2 demo board).
Because it is all fun and games . . .
Initially it was to be 3 x 3 feet, but then Martin said we could actually do 2 x 2 for demos (which is MUCH easier to transport), so that is what I went with (because for anything else, I plan on using neoprene mats to keep things variable (I added one in my kickstarter pledge even).
First step was a quick trip to home depot, were it was easy enough to pick up a 2 x 2 piece of plywood, and they even had 2 x 2 sheets of pink insulation foam. I figured I wanted to go big, so I wanted depth to the board (for a river).
I started by laying out existing terrain to get an idea of what I wanted. Of course, things change once I actually start building it, but it is a rough guide.
I figured I'd base it on a simple farm. Field in the top left, with a road going through the middle (with a turn in it) which has a bridge over a stream. Two small houses, some fencing around the field, a small set of fruit trees/bushes behind one house and a small orchard.

I had actually picked up two small 4Ground houses at Gencon, so I put them together quickly to get a better feel for the board with more 3D elements to it. I am not gluing these to the board to keep it easier to transport, but will leave specific places for them.


I then took my Hot Wire Foam Factory tools to go for the pink foam board. The foam knife did the large shapes (i.e. cutting out the river), while the wire shaper was used to trim up the edges.
 |
| one big piece of foam |
 |
| and now with a river in it. |

A couple of years ago I kickstarted a project for textured foam sheets with the plan to use them to make some buildings (like a church or other appropriate stone building). In my pledge, I swapped two of the regular stone sheets for cobblestone sheets (these were two sides, with the back being flagstones). So while I've got a big box of blue foam squares sitting in my basement, the cobblestones seemed perfect for the road. (You can now buy these from their website Firedragon Games)

I marked the back evenly, and then cut out the roads again using my foam knife.

I checked the placement of these, and put down some large craft sticks (ok, tongue depressors) which I had bought many, many years ago (when I was making my WFB orc fortress) for the bridge.

The next step was to add the hills, so I made some rough sketches on the second piece of foam I had picked up, cut and trimmed them. Then glued all the foam down to the board.
 |
| hill outlines |

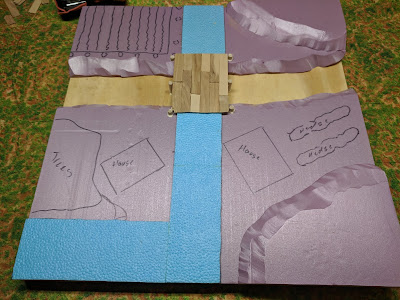
While I was waiting for this to dry, I built a bridge. My first attempt was just a bit too short in the end, so I made a second, this time staggering the sticks (which would be more realistic anyway). When the foam was dry, I drilled a few holes to add the supports (cut out of dowel) for the bridge. These also help as they show the exact placement of the bridge even though it isn't glued on yet.
You can also see where I blocked out the other features. The two houses, hedges and fence posts were all marked (the fences and hedges (wasn't that an old cigarette brand?) are all from Mantic's terrain crate. I also marked an area for the orchard (and full disclosure, it became an orchard instead of just plain woods only after I started writing this up, with the board just about the current state). I need to mark that area, because I want the trees to be removable. My initial thoughts are to make them magnetic, so I glued a piece of tin to the board for them.
Also, in the upper left you can see the field marked - I have seen some "rubber" fields and liked the idea of somewhat freshly plowed fields for some difficult terrain, so I made lines for the the furrows in the field. I then glued sand on the lines to raise them. Of course I forgot to take a picture that :-)
I painted thinned PVA glue over all the 'ground' areas, and covered it with sand. This both gives the ground texture as well as protects the insulation foam if you choose to spray paint it.

After that set overnight, I dumped the excess sand off. I then went back and redid a few missing spots, specifically where it was thin on the riverbed (because I want to use Vallejo Still Water for the river, so I am not painting it (to have the stream have a 'rocky' bottom)), as well as putting a thick line of glue on the edges of each road to build up the dirt next to it and hide the edge.

There are some blank spaces for the houses and hedges, and you can see where the metal plate for the magnetic trees is, but those are intentional. Also if you look carefully in the top left corner, you can see the furrows for the field (as well as the blank spaces where the Terrain Crate fence is going (I was going to link to it, but it isn't available yet (unless you bought it through the kickstarter)).
Once all the sand was dried, I started painting the board. I started off airbrushing it just to see how it would go. The road and forest spot were airbrushed black, and a couple of the furrows (with what I had left in my airbrush). Then everything else was given a coat of brown. I am NOT painting the sand at the bottom of the river as I like the way it looks.

I then used the airbrush to try some highlighting, with grey on the road, some dark yellow on the top of the furrows in the field, as well as a bit on the rest of the ground. While this worked well on the furrows, it didn't work for highlighting. I also airbrushed the bridge brown, as well as did a bit of brown on the bottom of the houses to represent just some dirt on them.

Part of the problem was my airbrush stopped working. I disassembled it and put it together again, and now it seems to be working as expected again, so I may yet be able to get away with some some airbrushing.
However I fell back to old fashioned dry brushing of grey on the road to make it come out more. I then added some dirt tracks where some people has used the road.
Next I added tufts from Huge Minis (that I got in their kickstarter) to the raised furrows in the field. This used up all I had of one color and half of another, so it looks like I need to be ordering more. I also added some in the river to represent river plants, as well as a few bit of flock. Some small rocks from the back yard were also added to break it up a bit.

I used some Vallejo water effects gel to block up the ends of the stream, then poured in their still water effects. This is liquid that dries clear and looks great. However it takes forever to dry. The gel will dry to clear, but it takes even longer (48 hours so far, and still cloudy).

Even though I only did a mm or so of water, it still cracked around several of the rocks. I added a thin second coat to it which should both fill in the cracks and add a little depth. Ideally I would like the river to be about a half inch deep, but it takes almost an entire bottle of the water effects to do about 1/8" or so - so that isn't happening for a demo board :-).
Meanwhile, I painted up the hedges from my Terrain Crate kickstarter, as well as the fences. I re-based some trees onto 40mm round magnetic bases, and added some "fruit" to them. (I tried doing that for the hedges, but it just didn't look good). I also pulled out a piece of scatter terrain (woodpile) that I had from THMiniatures first kickstarter. I have a few other pieces , but I while I want plenty of terrain, I also don't want it over crowded.
At this point it is basically done. I plan to demo it with forces on either side of the road, giving some open space in the center, but plenty of cover and interesting stuff to move around.


For now (at least), I'm not attaching the trees, buildings, hedges, fences or woodpile. This is to make it easier to transport. I'm also not gluing on the roofs of the houses, since, being a skirmish game, it is valid for models to enter the houses. The trees, of course, need to be able to be moved out of the wooded when moving figures through it.

At this point I think I'm basically done. I still need to seal the whole thing to make it more durable, as well as do something with the edges to make them more durable (maybe glue felt on them?) Of course I have to wait for the water to dry clear before I can do that as well.
Now to just (impatiently) wait for my kickstarter to arrive so I can paint up warbands and actually begin demoing the new game. Plus I plan to start running "Learn to play" sessions at conventions next year as well (these on full 3x3 mats as opposed to a 2x2 demo board).
Because it is all fun and games . . .
Comments
Post a Comment