Continuing with our Warpath wave 3 review (ok, and wave 4, as according to Mantic support, there was a computer error and the mule that was part of the GCPS Battle Group was missed - so that still has yet to ship) today we take a look at the GCPS / Plague mule (I picked up the Plague Mule battlegroup - which had the full GCPS Mule & the Plague 'upgrades' (or are they downgrades?) with it separately.

 I am going to first show how to assemble everything that is in common between the two kits, then show how the GCPS and Plague version differ.
I started with the truck bed. This is the main truck frame, the bed, walls and tailgate. The bed has three posts that fit nicely into the three holes in the truck frame. This kit is almost snap-together, the pieces fit so well.


Once the bed is in place, then the side walls go on easily. There are two pins on either side of the bed that fit into the holes in the side walls.

You want to be careful not to get glue in the holes for the tailgate. Like some of their other kits there are parts that are intended to be left loose so you can reposition them (if you desire). Simply put the pins of the truck tailgate into the holes on the bottom back of the side walls.

Glue the second wall into place, and the truck bed is done.

The tail gate easily flips down, and the two hand holds hold it in place when it is up. I like how the steps are modelled into the tailgate - when lowered they give easy access to the bed - a nice detail for how it would work in the real world.

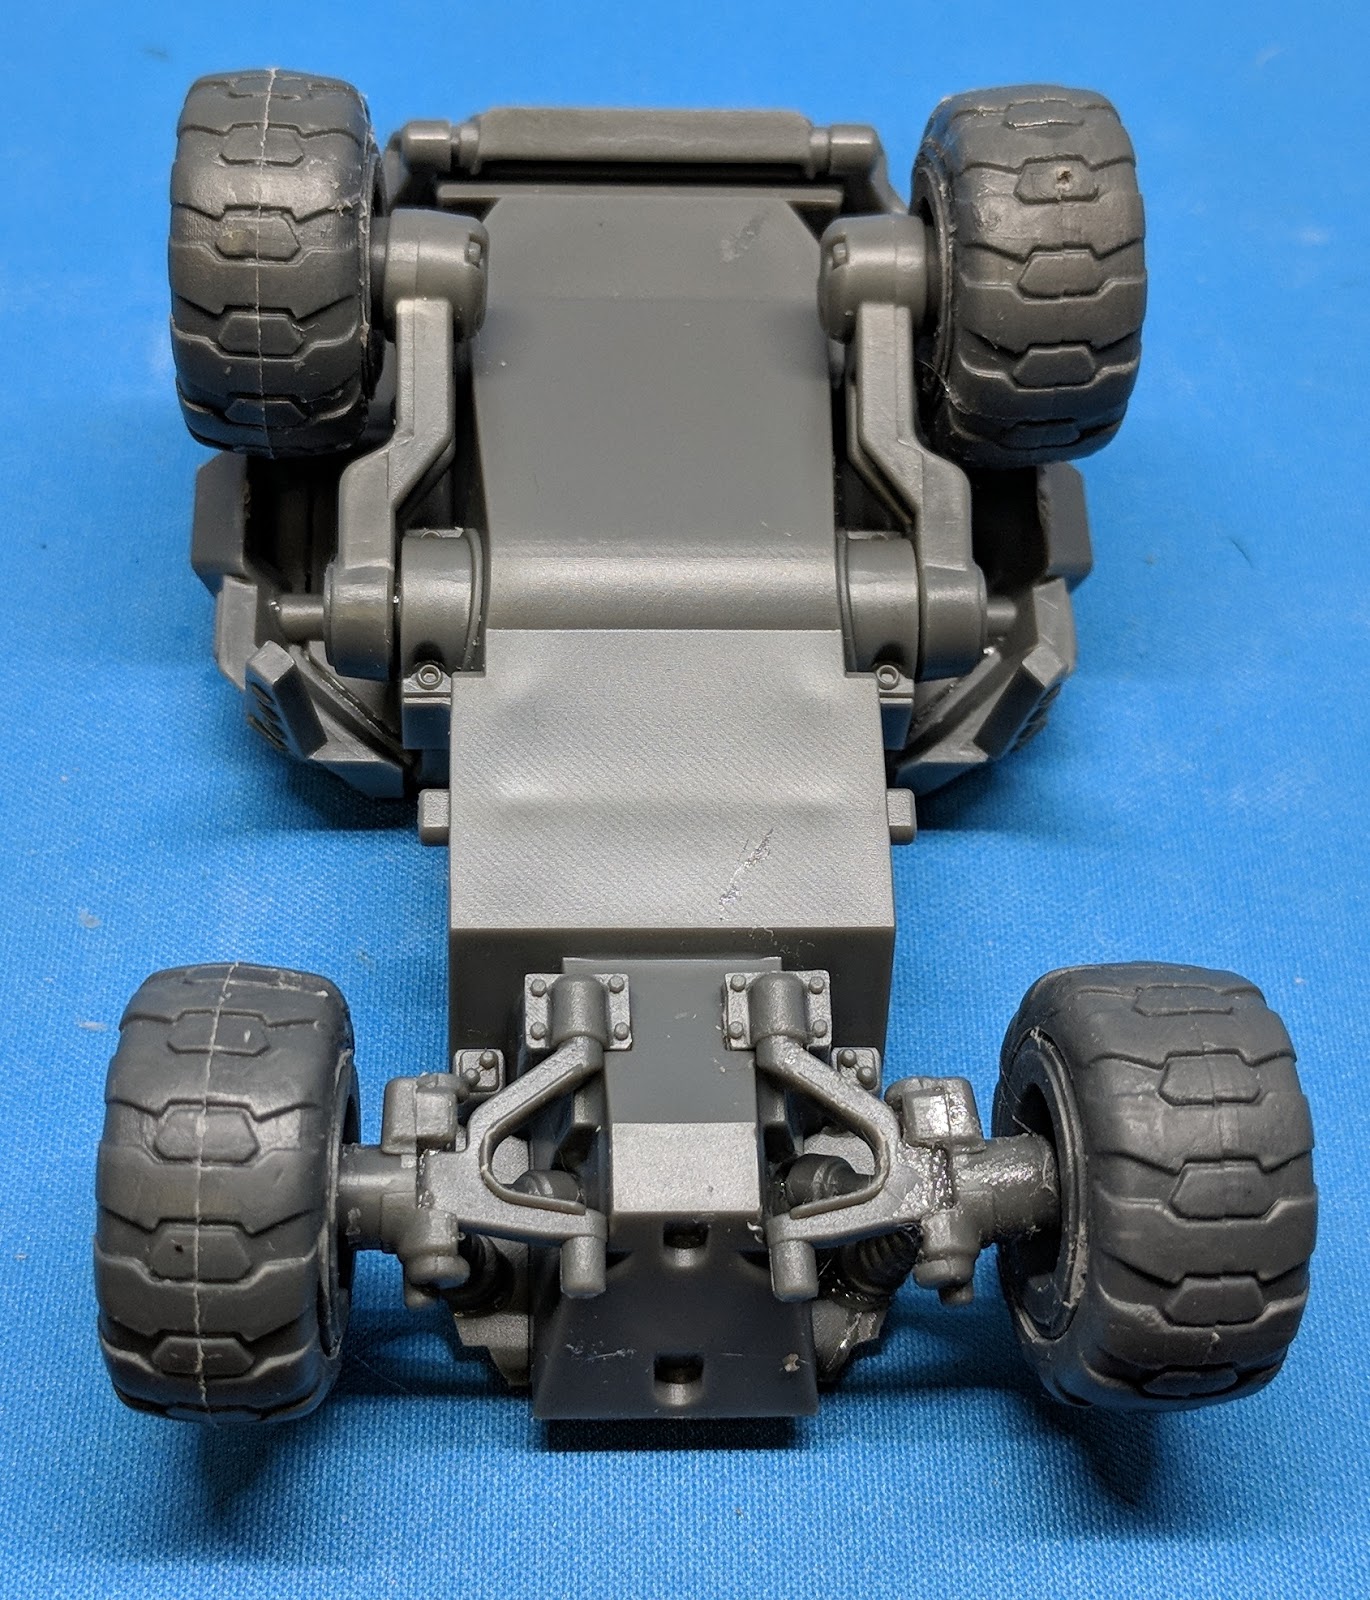
Next is the trickiest part - the suspension. This took me the longest to figure out - specifically because I had a couple of piece that I thought belonged there that didn't.
The rear is easy - there are two struts that fit on either side of the frame and fit into holes in the underside of the bed.

Simple slide the hole in the end over the large pin, and then rotate the shock around until the pin fits into the hole.


Do the other side, and the rear suspension is done.

The front suspension is three parts per side.

First, glue the small strut into the square hole in the main struts. It should sit at an angle pointing over the open part of the strut, with the round peg pointing up.

Then flip this combined piece over - so that the rectangular peg fits into the corresponding holes on the frame, and then the smaller round peg fits into the smaller hole on the side of truck frame.


The struts then fit over the end of this piece. If you look carefully, you will see that the pegs are slightly different sizes - so that the struts only fit well one way.


Slip the big end of the strut (with the slot in it) over the pins, and the round pin at the end goes in the hole on the frame.

Do this for both sides to complete the front suspension.

Next up are the wheels.

I'm not sure why they made the tires and wheels the way they did, where the wheel 'slides' completely into the tire (as opposed to making two halves like I've seen on my other vehicles). These are an extremely tight fit - in fact I would go so far as to saying to exact. The idea is to simply press the wheel into the tire. The problem I found (and no, it wasn't until the second set that I figured this out) is the tolerance is so exact it is easy to get a fairly large air bubble under the wheel, preventing it from going into the tire the entire way.
I pressed. I pushed, I used a hammer on it on the cement floor of the basement. And still it would not go in.
There are two ways to fix this. One it to take your hobby knife (which you already have out to clean up the small amount of flash and mold lines on the kit (yes, they seem to be MUCH more pronounced on the tires) and cut a groove in to the tire. It doesn't have to be deep, but needs to go all the way to the back. This groove will allow the air to escape, then the wheel now easily slides in.

The second method (and I didn't think of this until afterward) would be to use your pin vise and drill a hole in the back of the wheel. This doesn't have to be large - again just enough to let the air escape as you are pushing the wheel into the tire. This would actually be easier than cutting a groove if you have a handy dandy electric hand drill.
Now simply slide the tire pins into the holes in the suspension for them. This is also a tight fit, but the volume is much smaller, so it has much less impact.


That is almost all of the common components. The rear door and hand rails are also both the same, but those can't be installed until you put the cab on.

So now comes the choice between GCPS and Plague. "Good" guys or evil malevolence? Of course unless you bought the plague version, you don't have a choice (and if you have the plague, well then you don't have a choice either *cough* *cough* *cough*).
For the GCPS version, there are four parts to the cab (yes, I forgot the grill/winch - it was in another shot that I didn't use). There is the top, two sides, and the grill

The two long pins on the top of the cab fit easily into the two holes in the frame. Then the grill, winch fits underneath, with the pegs from the front suspension fitting into the holes on the back of the grill.


After you have installed the top of the cab, then the last three 'generic' pieces can be added - the back door for the cab and the two hand rails that fit between the cab and the bed of the truck.


Next is the two side panels / doors. These each only fit one way and snap into place.


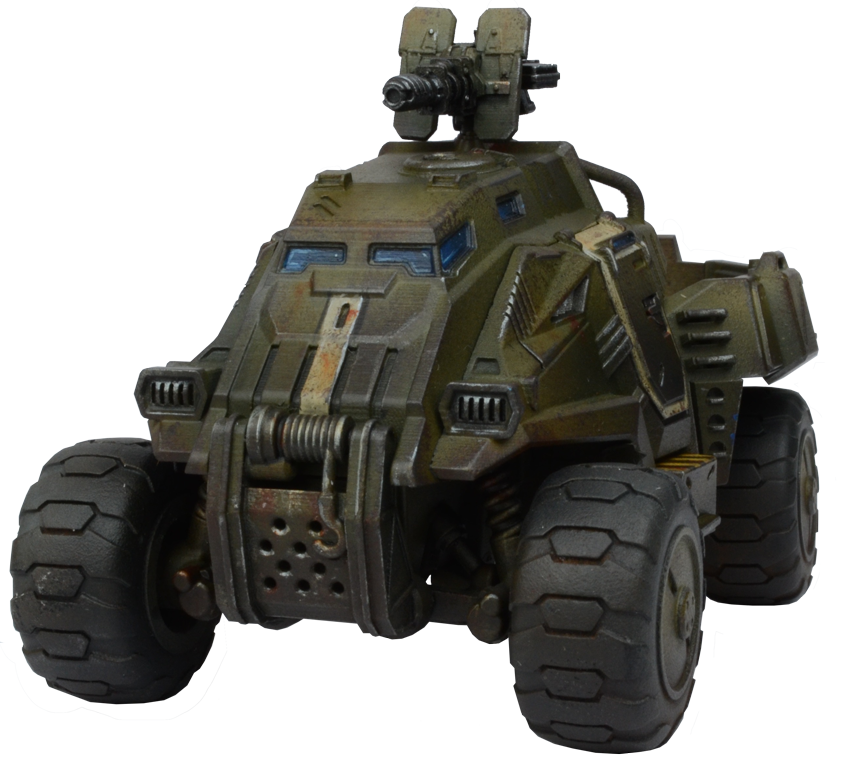
And all that is left is the weaponry. There are two weapon choices - the autocannon or the laser cannon. They both have separate hand grips - these are keyed so each only fits the one gun. Gunners are not provided - you have to furnish these from your marine sprues.


There are two shields that fit on either side of each of these guns.
I'm not sure, but I think either shield can go with either gun. These basically are intended to give some protection to whoever is shooting the gun.

The guns then mount in the hole in the back of the cab. These may fit snug enough for game play, or you can magnetize them to make them a bit sturdier.
But with that, your GCPS mule is complete.


If you have the plague variant, then you actually have a few more pieces.


The plague like to have access to the open air - so they shoot out the windows - and open the top hatch as well as one of the doors. The cockpit attaches the exact same way the GCPS one does.

Instead of a grill and winch, the plague have replaced this with spikes. These fit on to the frame and suspension exactly like the grill/winch from the GCPS, just look nastier.

The side panels for the plague fit just like the GCPS ones do. You can choose to leave off the hatch and door, glue the open, or glue them shut.

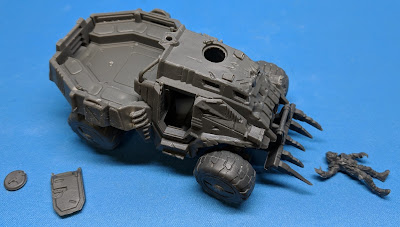

As you can see in the above picture, there is a dead body included in the plague kit. I think the designer of the plague vehicles liked Firefly, as the plague strap dead bodies onto their vehicles like the Reavers from the series / movie (Serenity) do.
I found the one body fits well onto the front of the cab - there are some dents that match the head.


The plague also add spikes to the wheels - just in case they end up in a sudden chariot race. These glue right over the hubcaps on the wheels (they have small notches to fit).
The plague even have a different gun if you want to use it. I did for mine because I thought it looked better. It also comes in two pieces. The pin (before the ammo magazine) is much smaller, so it does not hold in the hole without gluing or magnetizing it.


And that finishes the Plague Mule.

A quick comparison shot of the Plague v GCPS mule.

As well as one comparing to a few other vehicles (the Veer-Myn tunneler and the Forge Fathers Hultr Half-Track).

Now you have a fast vehicle to send your GCPS marines straight into battle (unless they choose to fly - in which case they need a Hornet - which I'll show next time).
Which variant do you prefer?
Because it is all fun and games

I started with the truck bed. This is the main truck frame, the bed, walls and tailgate. The bed has three posts that fit nicely into the three holes in the truck frame. This kit is almost snap-together, the pieces fit so well.


Once the bed is in place, then the side walls go on easily. There are two pins on either side of the bed that fit into the holes in the side walls.

You want to be careful not to get glue in the holes for the tailgate. Like some of their other kits there are parts that are intended to be left loose so you can reposition them (if you desire). Simply put the pins of the truck tailgate into the holes on the bottom back of the side walls.

Glue the second wall into place, and the truck bed is done.

The tail gate easily flips down, and the two hand holds hold it in place when it is up. I like how the steps are modelled into the tailgate - when lowered they give easy access to the bed - a nice detail for how it would work in the real world.

Next is the trickiest part - the suspension. This took me the longest to figure out - specifically because I had a couple of piece that I thought belonged there that didn't.
The rear is easy - there are two struts that fit on either side of the frame and fit into holes in the underside of the bed.

Simple slide the hole in the end over the large pin, and then rotate the shock around until the pin fits into the hole.


Do the other side, and the rear suspension is done.

The front suspension is three parts per side.

First, glue the small strut into the square hole in the main struts. It should sit at an angle pointing over the open part of the strut, with the round peg pointing up.

Then flip this combined piece over - so that the rectangular peg fits into the corresponding holes on the frame, and then the smaller round peg fits into the smaller hole on the side of truck frame.


The struts then fit over the end of this piece. If you look carefully, you will see that the pegs are slightly different sizes - so that the struts only fit well one way.


Slip the big end of the strut (with the slot in it) over the pins, and the round pin at the end goes in the hole on the frame.

Do this for both sides to complete the front suspension.

Next up are the wheels.

I'm not sure why they made the tires and wheels the way they did, where the wheel 'slides' completely into the tire (as opposed to making two halves like I've seen on my other vehicles). These are an extremely tight fit - in fact I would go so far as to saying to exact. The idea is to simply press the wheel into the tire. The problem I found (and no, it wasn't until the second set that I figured this out) is the tolerance is so exact it is easy to get a fairly large air bubble under the wheel, preventing it from going into the tire the entire way.
I pressed. I pushed, I used a hammer on it on the cement floor of the basement. And still it would not go in.
There are two ways to fix this. One it to take your hobby knife (which you already have out to clean up the small amount of flash and mold lines on the kit (yes, they seem to be MUCH more pronounced on the tires) and cut a groove in to the tire. It doesn't have to be deep, but needs to go all the way to the back. This groove will allow the air to escape, then the wheel now easily slides in.

The second method (and I didn't think of this until afterward) would be to use your pin vise and drill a hole in the back of the wheel. This doesn't have to be large - again just enough to let the air escape as you are pushing the wheel into the tire. This would actually be easier than cutting a groove if you have a handy dandy electric hand drill.
 |
| Either method will give you nice tires and you won't be able to tell |


That is almost all of the common components. The rear door and hand rails are also both the same, but those can't be installed until you put the cab on.

So now comes the choice between GCPS and Plague. "Good" guys or evil malevolence? Of course unless you bought the plague version, you don't have a choice (and if you have the plague, well then you don't have a choice either *cough* *cough* *cough*).
For the GCPS version, there are four parts to the cab (yes, I forgot the grill/winch - it was in another shot that I didn't use). There is the top, two sides, and the grill
 |
| somebody should dock the pay of the lazy photographer |

The two long pins on the top of the cab fit easily into the two holes in the frame. Then the grill, winch fits underneath, with the pegs from the front suspension fitting into the holes on the back of the grill.


After you have installed the top of the cab, then the last three 'generic' pieces can be added - the back door for the cab and the two hand rails that fit between the cab and the bed of the truck.


Next is the two side panels / doors. These each only fit one way and snap into place.


And all that is left is the weaponry. There are two weapon choices - the autocannon or the laser cannon. They both have separate hand grips - these are keyed so each only fits the one gun. Gunners are not provided - you have to furnish these from your marine sprues.


There are two shields that fit on either side of each of these guns.
 |
| laser cannon on the left, autocannon on the right |

The guns then mount in the hole in the back of the cab. These may fit snug enough for game play, or you can magnetize them to make them a bit sturdier.
But with that, your GCPS mule is complete.


If you have the plague variant, then you actually have a few more pieces.


The plague like to have access to the open air - so they shoot out the windows - and open the top hatch as well as one of the doors. The cockpit attaches the exact same way the GCPS one does.

Instead of a grill and winch, the plague have replaced this with spikes. These fit on to the frame and suspension exactly like the grill/winch from the GCPS, just look nastier.

 |
| Going for that Max look |


As you can see in the above picture, there is a dead body included in the plague kit. I think the designer of the plague vehicles liked Firefly, as the plague strap dead bodies onto their vehicles like the Reavers from the series / movie (Serenity) do.
I found the one body fits well onto the front of the cab - there are some dents that match the head.


The plague also add spikes to the wheels - just in case they end up in a sudden chariot race. These glue right over the hubcaps on the wheels (they have small notches to fit).
The plague even have a different gun if you want to use it. I did for mine because I thought it looked better. It also comes in two pieces. The pin (before the ammo magazine) is much smaller, so it does not hold in the hole without gluing or magnetizing it.


And that finishes the Plague Mule.

A quick comparison shot of the Plague v GCPS mule.

As well as one comparing to a few other vehicles (the Veer-Myn tunneler and the Forge Fathers Hultr Half-Track).

Now you have a fast vehicle to send your GCPS marines straight into battle (unless they choose to fly - in which case they need a Hornet - which I'll show next time).
Which variant do you prefer?
Because it is all fun and games
Very helpful, thank you.
ReplyDeleteVery usefull review, thank you for the taking the time.
ReplyDelete