In June, the Asterians finally get some vehicular love from Mantic
This, like all the larger Warpath vehicles, is hard plastic - though it has been cut off the sprues to save space. My kickstarter version arrived, so it is time to share. Look for the GCPS/Plague Mule and GCPS/Plague Hornet write ups soon - though I haven't quite figured out the entire assembly of those yet (thus doing the later release first).
The kit came in two bags without instructions. The kit makes with the Chira Transport or the Chroma Force Platform

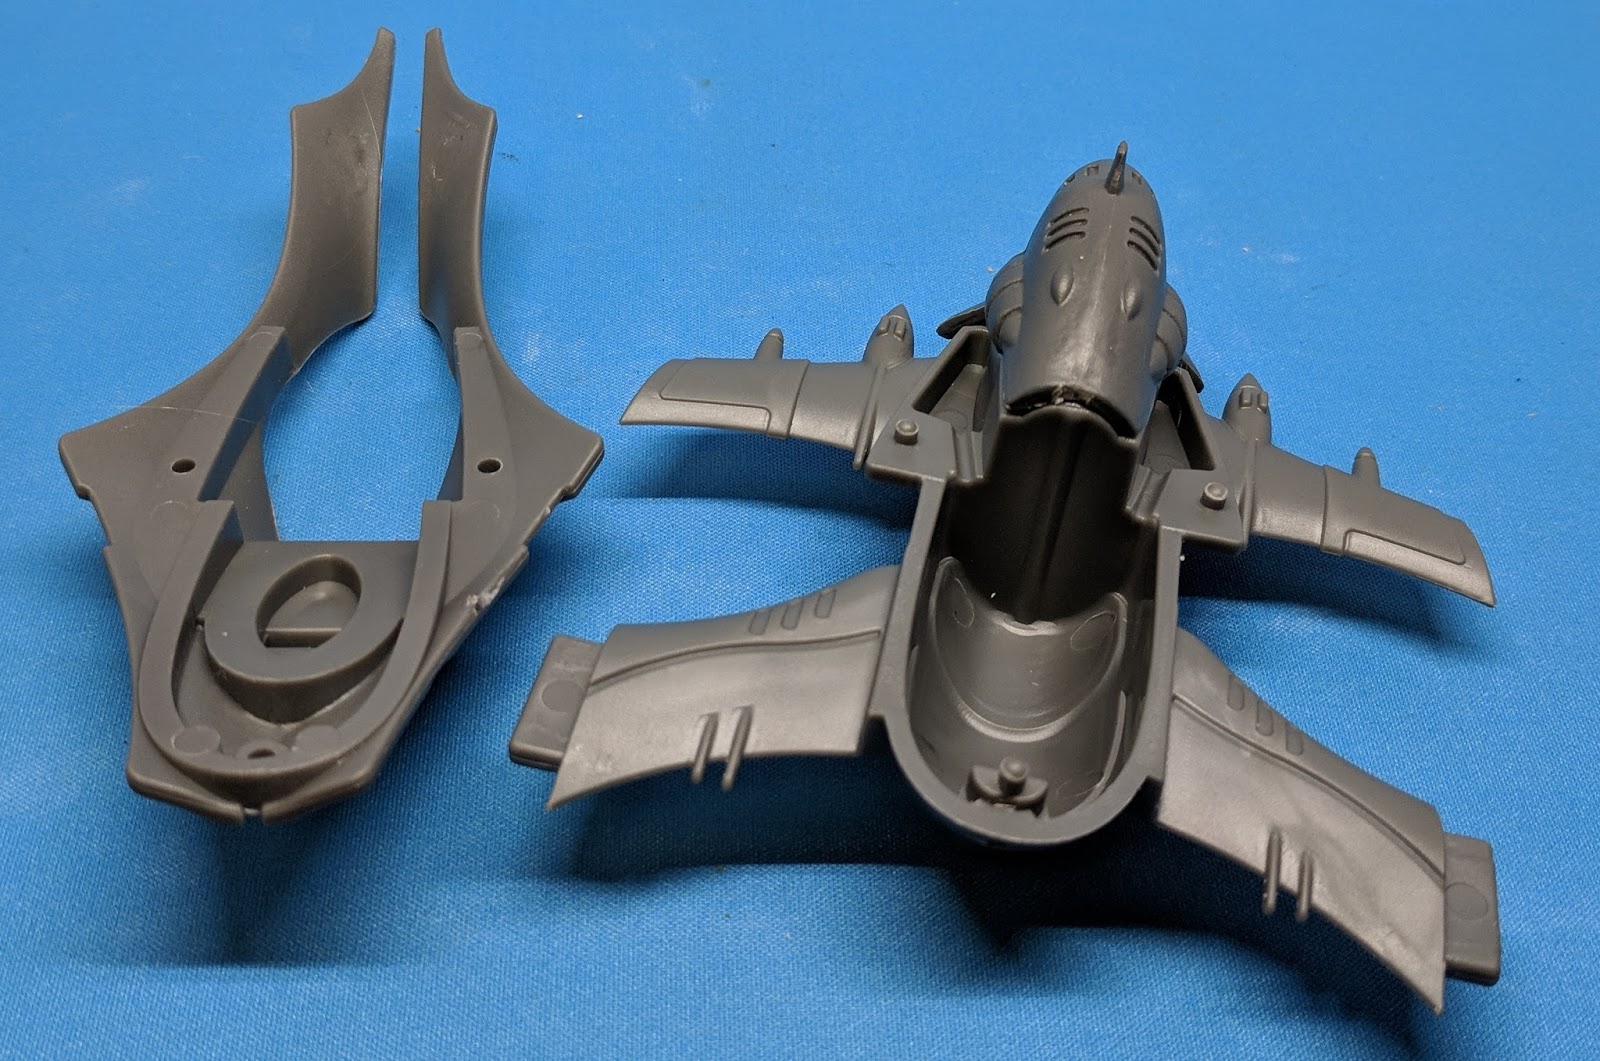
So first we'll do all the common parts. We can begin with the engine pods. There is a left and right outer shell, with matching end caps and fins.


The fins can be a little tricky matching to the correct sides. If you look at the tabs, you can see a slight difference.

When you fit the fin in the outer shell, it should fit fairly snugly

If there is a big gap, then you have the wrong fin, so switch.

The same goes for the end caps. At first look they seem to be the same, but there is a definite left and right one.

When you put the end cap on, the sides should fit snugly. IF they don't, then again swap them.


Next is the cockpit / body. The has several parts


First slide the sensor panel into the front of the body


Then the inner cowl fits over the sensors. Interestingly, this is PVC, not the hard plastic that most of the model is molded in.


Then put the outer cowl over these - the pegs easily align with the holes.


Now turn the body over. There are three divots in the back of the body, just below the cross where the hovering stand attaches. These are for the communications array and distortion field. The three larger pieces are the communication array. If you want this upgrade (or to model it at least) then glue these into the two forward divots. If you are using the distortion field, put it in the middle, back divot. If you aren't using it, put the third communication array piece there.


I am a big proponent of setting up these models so they can be either option - however this does not really lend itself to this. Mainly because the engine pods have an inner piece that is different between the two ships. It fits tight enough that you could assemble either without glue and then magnetize them to the body. However they fit so tightly that I just decided to build both versions instead.
So for the transport, you use the inner pod faces with the hooks. Since you are transporting robots, they don't need and atmosphere, and hang from these hooks.


The left and right ones each only fit one side due to the way they keyed the connector. Simply glue five of the transport hooks into each appropriate side (I can't help but think these look like the underside of a lobster :-) ).


Then these fit snugly in to the outer pods

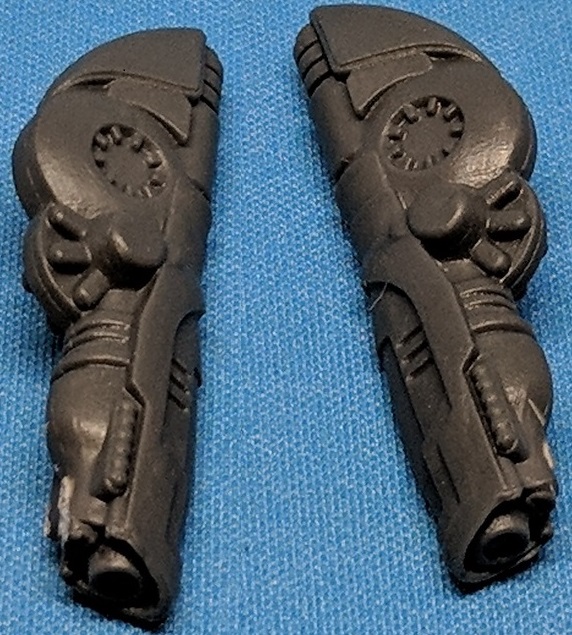
Next is the weapon turret. This is in four pieces - two guns and two base pieces


The guns attach to either side of the base that looks like it has a tire on it (Yes, when I first looked at it I thought it was a part of the landing gear :-) ). The curve side of the guns goes down into the curve of the base.

Then glue this base onto the lower base

The lower base then fits over the cross shaped connector hold in the body

Then simply attach the engine / transport pods

The stand has a curved piece (as opposed to the straight arm for the Enforcer Interceptor) that only has one cross on it (instead of two).

And the Chira Transporter is complete.
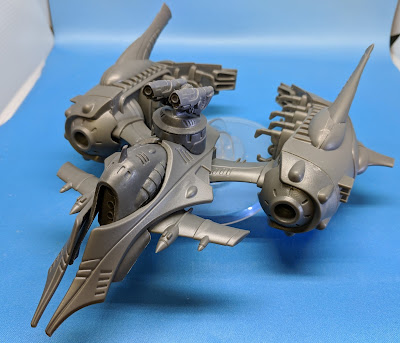


If you have decided you need more firepower instead of transport, then the Chroma Force Platform is what you want.
The inner engine pods for the chroma only have a single fin instead of the transport hooks.


Then attach the inner pod to the outer pod, the same way as the chira.

These then attach to the body exactly the same as for the chira.
Of course the big difference is the weapon - either the Super Heavy Fision Beamer or the Super Heavy Plasma Vortex.

Each of the weapons has a base for it - these have different shaped connectors, so you can't assemble them wrong.


There is a platform for the weapons to sit on. It has a piece to connect to the body of the vehicle.


Simply attach the connector the the large base, then the cross piece goes into the cross connection hole in the body.
The weapons fit very snugly into the platform, so you do not need to glue them in (or even magnetize them) to allow you to swap them out as desired.
The Heavy Fission Beamer is the longer of the two weapons. (You can get pictures of the weapons (from the weapon drones) on pg 83 of the Warpath rulebook, or pg 87 of the Firefight book).


And you have the Chroma Force Platform complete.
I wanted to compare it to other vehicles - so the natural one was the Enforcer Interceptor

I wanted an even closer comparison - so I put the Chira on top of the Interceptor to get a better comparison.

Please drive your Chira a little more carefully so you don't end up in this situation.
And that is all it takes for this kit.
What do you prefer - the transport or the weapon? And which weapon do you like - the Fission Beamer with anti-tank(D3+2) or the anti-personnel Plasma Vortex (with blast(2D3), shredder)?
Because it is all fun and games . . .
 |
| Asterian Chroma Force Platform |
The kit came in two bags without instructions. The kit makes with the Chira Transport or the Chroma Force Platform

So first we'll do all the common parts. We can begin with the engine pods. There is a left and right outer shell, with matching end caps and fins.


The fins can be a little tricky matching to the correct sides. If you look at the tabs, you can see a slight difference.

When you fit the fin in the outer shell, it should fit fairly snugly

If there is a big gap, then you have the wrong fin, so switch.

The same goes for the end caps. At first look they seem to be the same, but there is a definite left and right one.

When you put the end cap on, the sides should fit snugly. IF they don't, then again swap them.


Next is the cockpit / body. The has several parts


First slide the sensor panel into the front of the body


Then the inner cowl fits over the sensors. Interestingly, this is PVC, not the hard plastic that most of the model is molded in.


Then put the outer cowl over these - the pegs easily align with the holes.

Now turn the body over. There are three divots in the back of the body, just below the cross where the hovering stand attaches. These are for the communications array and distortion field. The three larger pieces are the communication array. If you want this upgrade (or to model it at least) then glue these into the two forward divots. If you are using the distortion field, put it in the middle, back divot. If you aren't using it, put the third communication array piece there.


I am a big proponent of setting up these models so they can be either option - however this does not really lend itself to this. Mainly because the engine pods have an inner piece that is different between the two ships. It fits tight enough that you could assemble either without glue and then magnetize them to the body. However they fit so tightly that I just decided to build both versions instead.
So for the transport, you use the inner pod faces with the hooks. Since you are transporting robots, they don't need and atmosphere, and hang from these hooks.


The left and right ones each only fit one side due to the way they keyed the connector. Simply glue five of the transport hooks into each appropriate side (I can't help but think these look like the underside of a lobster :-) ).


Then these fit snugly in to the outer pods

Next is the weapon turret. This is in four pieces - two guns and two base pieces


The guns attach to either side of the base that looks like it has a tire on it (Yes, when I first looked at it I thought it was a part of the landing gear :-) ). The curve side of the guns goes down into the curve of the base.

Then glue this base onto the lower base

The lower base then fits over the cross shaped connector hold in the body

Then simply attach the engine / transport pods

The stand has a curved piece (as opposed to the straight arm for the Enforcer Interceptor) that only has one cross on it (instead of two).

And the Chira Transporter is complete.


If you have decided you need more firepower instead of transport, then the Chroma Force Platform is what you want.
The inner engine pods for the chroma only have a single fin instead of the transport hooks.


Then attach the inner pod to the outer pod, the same way as the chira.

These then attach to the body exactly the same as for the chira.
Of course the big difference is the weapon - either the Super Heavy Fision Beamer or the Super Heavy Plasma Vortex.


The weapons fit very snugly into the platform, so you do not need to glue them in (or even magnetize them) to allow you to swap them out as desired.
The Heavy Fission Beamer is the longer of the two weapons. (You can get pictures of the weapons (from the weapon drones) on pg 83 of the Warpath rulebook, or pg 87 of the Firefight book).


I wanted to compare it to other vehicles - so the natural one was the Enforcer Interceptor


Please drive your Chira a little more carefully so you don't end up in this situation.
And that is all it takes for this kit.
What do you prefer - the transport or the weapon? And which weapon do you like - the Fission Beamer with anti-tank(D3+2) or the anti-personnel Plasma Vortex (with blast(2D3), shredder)?
Because it is all fun and games . . .
Very good review, as usual. Thank you for your work and for sharing.
ReplyDeleteThank you. This guide was super helpful in assembling my Asterians.
ReplyDelete