A few months ago I talked about the Naiad Wyrmriders and how to assemble these heavy, metal large cavalry models.
At the end of that post, I showed a preview picture of the Naiad Wyrmrider Centurion model, which was coming out in resin.
I finally got my hands on one (disclaimer: I received this as part of my ongoing plastic crack addiction (i.e. as part of a Pathfinder reward for running an event)), and wow!
The difference between the metal and resin is simply amazing. The detail is just as good, if not better, than the metal. Plus it weighs close to nothing - as opposed to the metal ones - which, I know, if I ever drop, are going to shatter due to their weight (even with all the pinning). This feels like it could almost just float to the ground.
Now resin isn't perfect - and ideally if Mantic was a company worth a billion Pounds Sterling (though billion dollars just sounds so much better to my American ears) then they would be able to make every model in hard plastic. But it is a small one, and I'm guessing that Ronnie only has one gold plated Jaguar and a single diamond studded swimming pool in his mansion, so hard plastic isn't going to happen for most models.
Resin does tend to be brittle on fine parts (as I'll show later). While easy to clean up with a knife - dust from it can be toxic - so if you ever need to sand or drill it, a mask is recommended. Like metal it requires super glue to assemble, but unlike metal the light weight means that pinning is not needed nearly as often. Being light weight though means that the joints don't have much pressure on them, so rarely need pinning.
Ok, on to the miniature, piece by piece.
First off is the main body. I had to laugh a bit because the resin 'sprue' actually came quite in handy for photographing the parts.


The the tail


The upper body. This piece had already broken off the 'sprue' in the bag

Then the saddle


The head. This time I actually grew a brain and used the sprue from the mantic 50mm base to hold it in place. (Because the piece of excess resin that came from the casting wasn't flat. I mean come on - can't they better design throw away excess scrap to be more useful for me to photograph the parts?)


There are also two fins


The back banner also held the spear arm (I assume), as it was also already broken off in the bag.

The Centurion's body and head


The shield and lower jar of the wyrm


and lastly, the spear arm


A new hobby knife blade and cleanup was quick and easy. All the parts laid out in approximate order for assembly.
This was actually easy to assemble, but only because it is the exact same configuration as the three other wyrmriders - tail, body, upper body, saddle, head. Most of the joins fit extremely well.

I did end up with one issue. I'm not sure if this was miscast or I'm just that sloppy. The body turned out to be hollow (no wonder it had no weight at all to it) - and when I clipped off the 'sprue', it ended up leaving a whole. I had hoped that this would be covered up by the base, but no - it is right in the middle. It looks like I'll need to get out some green stuff.
Then the spike on the 'collar' broke off - I tried to glue it back on, but as you can see - that failed (and the spike fell somewhere between my work desk and my light box (which is not on my game table in the basement - a much better location, but it does mean I have to carry everything up and down the stairs to take pictures in the box.

The next pictures are at my work space (ok, the dining room table next to my desk), so I used the foam insert in the packaging for a background. Trying to actually assemble models in the light box is not a great idea, and having it on the table leaves no room for anything else unfortunately.
So the first thing is gluing the jaw to the head.

Then the tail is glued to the body. Here is a closeup - you can barely tell where the joint is. The idea of putting the 'collars' to hide all the joints was great.
While I haven't bought any GW miniatures in years, some of the last kits I did purchase were a giant (I have only bought three of them - don't judge me) and the Dwarf Gyrocoptor/Gyrobomber. The giant was GW's first fully CAD model, and while the pieces on the sprues don't make a lot of sense (and definitely require instructions), they manage to hide so many of the joints extremely well. The GyroBomber was the same way. So while I may not like GW as a company, you can't complain about the quality of their models (their style on the other hand . . . )
next, glue the upper body to the assembly - again they put a "collar" to hide the join.

Then the saddle. This is a bit weird at first, until you realize it is bending back over it's body.

Then the assembled head. This is the one joint that was not smooth - there was a square pin on the saddle side that didn't fit the square hole on the head. Plus while the back of the head was almost completely flat - the join on the saddle wasn't. I tried to trim the pin, and it turned out to have a bubble in it and broke in half, so I just cut it off completely and smoothed out the side as much as possible. This did leave a small gap (which may not even need filling)


The saddle has a hole to mount the banner in. I still haven't decided what to do about it (see below). The fins fit nicely on the sides.

Assembling the rider was also simple. The shoulder/arm joints were flat, allowing any position needed on the arms.

The head is a shallow ball/socket joint - just like every other Naiad (metal and plastic).
Then the shield fits on nicely (the right foot is actually there - I cropped out my finger holding the min :-) )

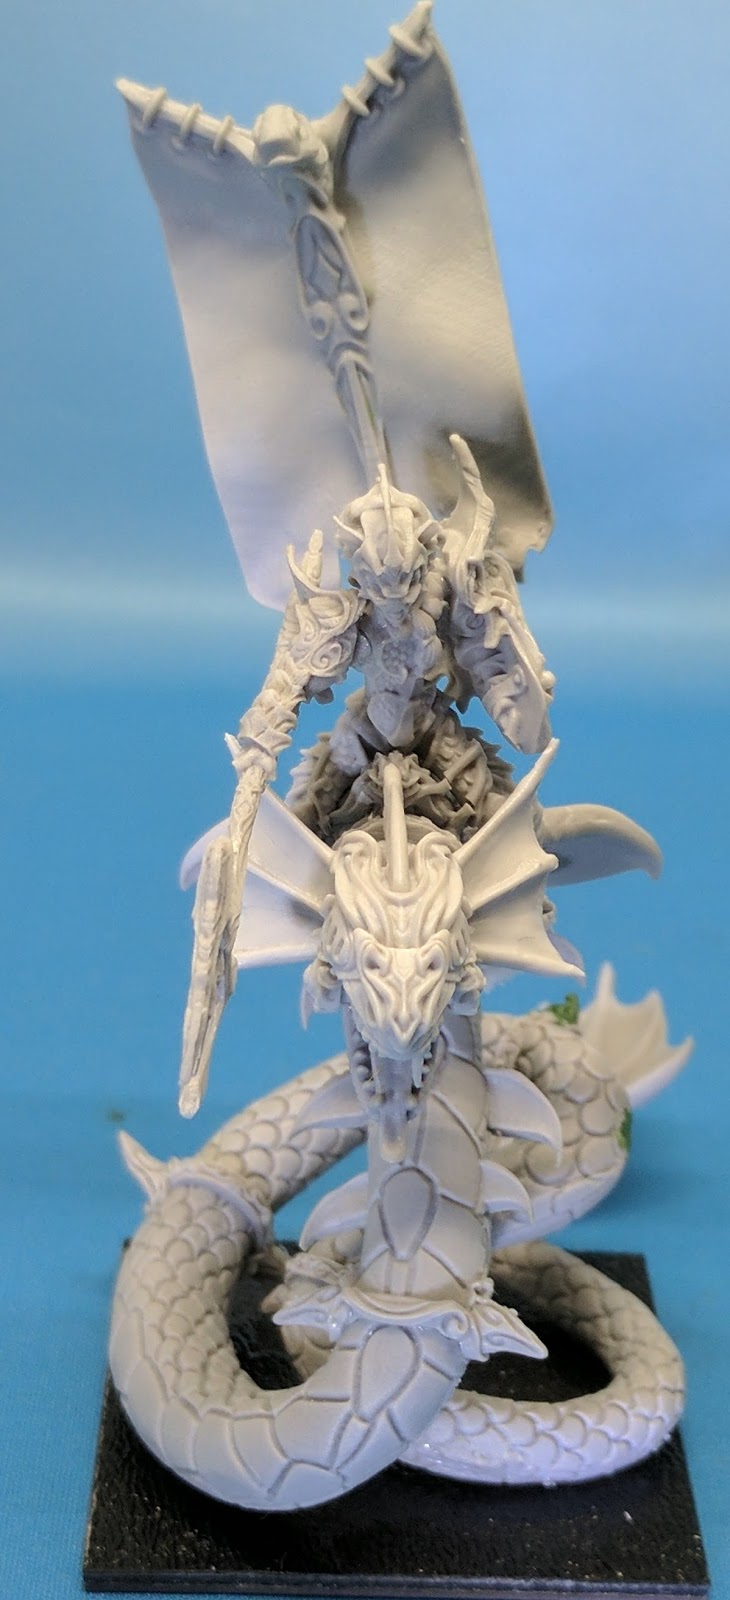
The rider then sits nicely atop he mount


And the banner slips right into the mount. However . . .

A comparison shot of the regiment w/ the hero. His mount is a bit taller, and the banner makes the miniature much taller.

The problem is the bins I used to transport everything are about 2" deep - and the banner (and his arm) will not fit.

The arm was easy to fix - a little super glue remover then re-do it pointing a bit downward.

The entire assembly took less than half an hour, including clean up. Very quick and easy, and not a pin in sight. Now of course we'll see if it holds up, but when I started putting the metal together without pins all the joints quickly broke.

You can see the greenstuff 'repairs' here. Because the body was hollow, I had to fill the hole, not just cover it up, to prevent the green stuff from leaving a concave indent when it dried.

I had thought about using a wax mold (like I did here) to recreate the spike - but then I couldn't find the molding wax. :-( So I tried to sculpt a spike - it is a bit thick but I hope it won't be very noticeable once I paint it up (kind of like putting makeup on a zit).

I do like the new pose for the arm - it lines up better with the head, and he now appears to be pointing his trident down at somebody from a superior position (both physically and (in his mind at least) status wise). Kind of a "bow down before me land dweller" vibe.

I put a long pin in the bottom of the banner pole, so it can be removed. I'm not sure a magnet would work well here, and you don't want it to rotate, so I want to keep the 'socket' intact. Plus it is always fun to watch some newbie grab the flag and pull it off, thinking they broke it (and then just slip it back in) :-)
I do want to make one note - while working on the green stuff, the tail did come off. Thinking about it after the fact, I should have made the repairs to the body BEFORE I put everything together (but who wants to wait when the model is begging for assembly). I just cleaned off the parts and glued them back together, I don't expect this to be a problem now that it is glued to the base - as both the body and the tail touch the base (so for that specific joint to break again, one of those two would ALSO have to break off the base).
This was a fun model to assemble, and I look forward to painting it (once I decide on a color scheme for the wyrm). It is a little unfortunate that this is going in a demo army, as it deserves a premium paint job (I'd love to see what Claudia Zuminich, Brandon Palmer or James Wappel could do with it).
Now I don't want Mantic to waste any of their product development money, but it would not be a bad thing if the metal molds for these wyrm riders were to wear out quickly, just so we could get resin versions. I work in the computer industry, and we have NEVER heard of laptops being accidentally dropped (or run over by a car) when they weren't working well but were not yet up for replacement (no, I have never done that, though I did once accidentally spill coffee into one of mine). Not that I am asking for any harm, but accidents do happen, and the resin model is so much superior (weight, ease of assembly) to the metal that even with the brittleness I would almost buy a new regiment of these just to get resin and resign the metal ones to the big bin of unpainted miniatures. Almost.
Because it is all fun and games . . .
At the end of that post, I showed a preview picture of the Naiad Wyrmrider Centurion model, which was coming out in resin.
 |
| Because I'm completely unable to actually square up a simple box in a picture :-) |
The difference between the metal and resin is simply amazing. The detail is just as good, if not better, than the metal. Plus it weighs close to nothing - as opposed to the metal ones - which, I know, if I ever drop, are going to shatter due to their weight (even with all the pinning). This feels like it could almost just float to the ground.
Now resin isn't perfect - and ideally if Mantic was a company worth a billion Pounds Sterling (though billion dollars just sounds so much better to my American ears) then they would be able to make every model in hard plastic. But it is a small one, and I'm guessing that Ronnie only has one gold plated Jaguar and a single diamond studded swimming pool in his mansion, so hard plastic isn't going to happen for most models.
Resin does tend to be brittle on fine parts (as I'll show later). While easy to clean up with a knife - dust from it can be toxic - so if you ever need to sand or drill it, a mask is recommended. Like metal it requires super glue to assemble, but unlike metal the light weight means that pinning is not needed nearly as often. Being light weight though means that the joints don't have much pressure on them, so rarely need pinning.
Ok, on to the miniature, piece by piece.
First off is the main body. I had to laugh a bit because the resin 'sprue' actually came quite in handy for photographing the parts.


The the tail


The upper body. This piece had already broken off the 'sprue' in the bag

 |
| sorry for the cropping, but it is better than my fingers |


The head. This time I actually grew a brain and used the sprue from the mantic 50mm base to hold it in place. (Because the piece of excess resin that came from the casting wasn't flat. I mean come on - can't they better design throw away excess scrap to be more useful for me to photograph the parts?)


There are also two fins


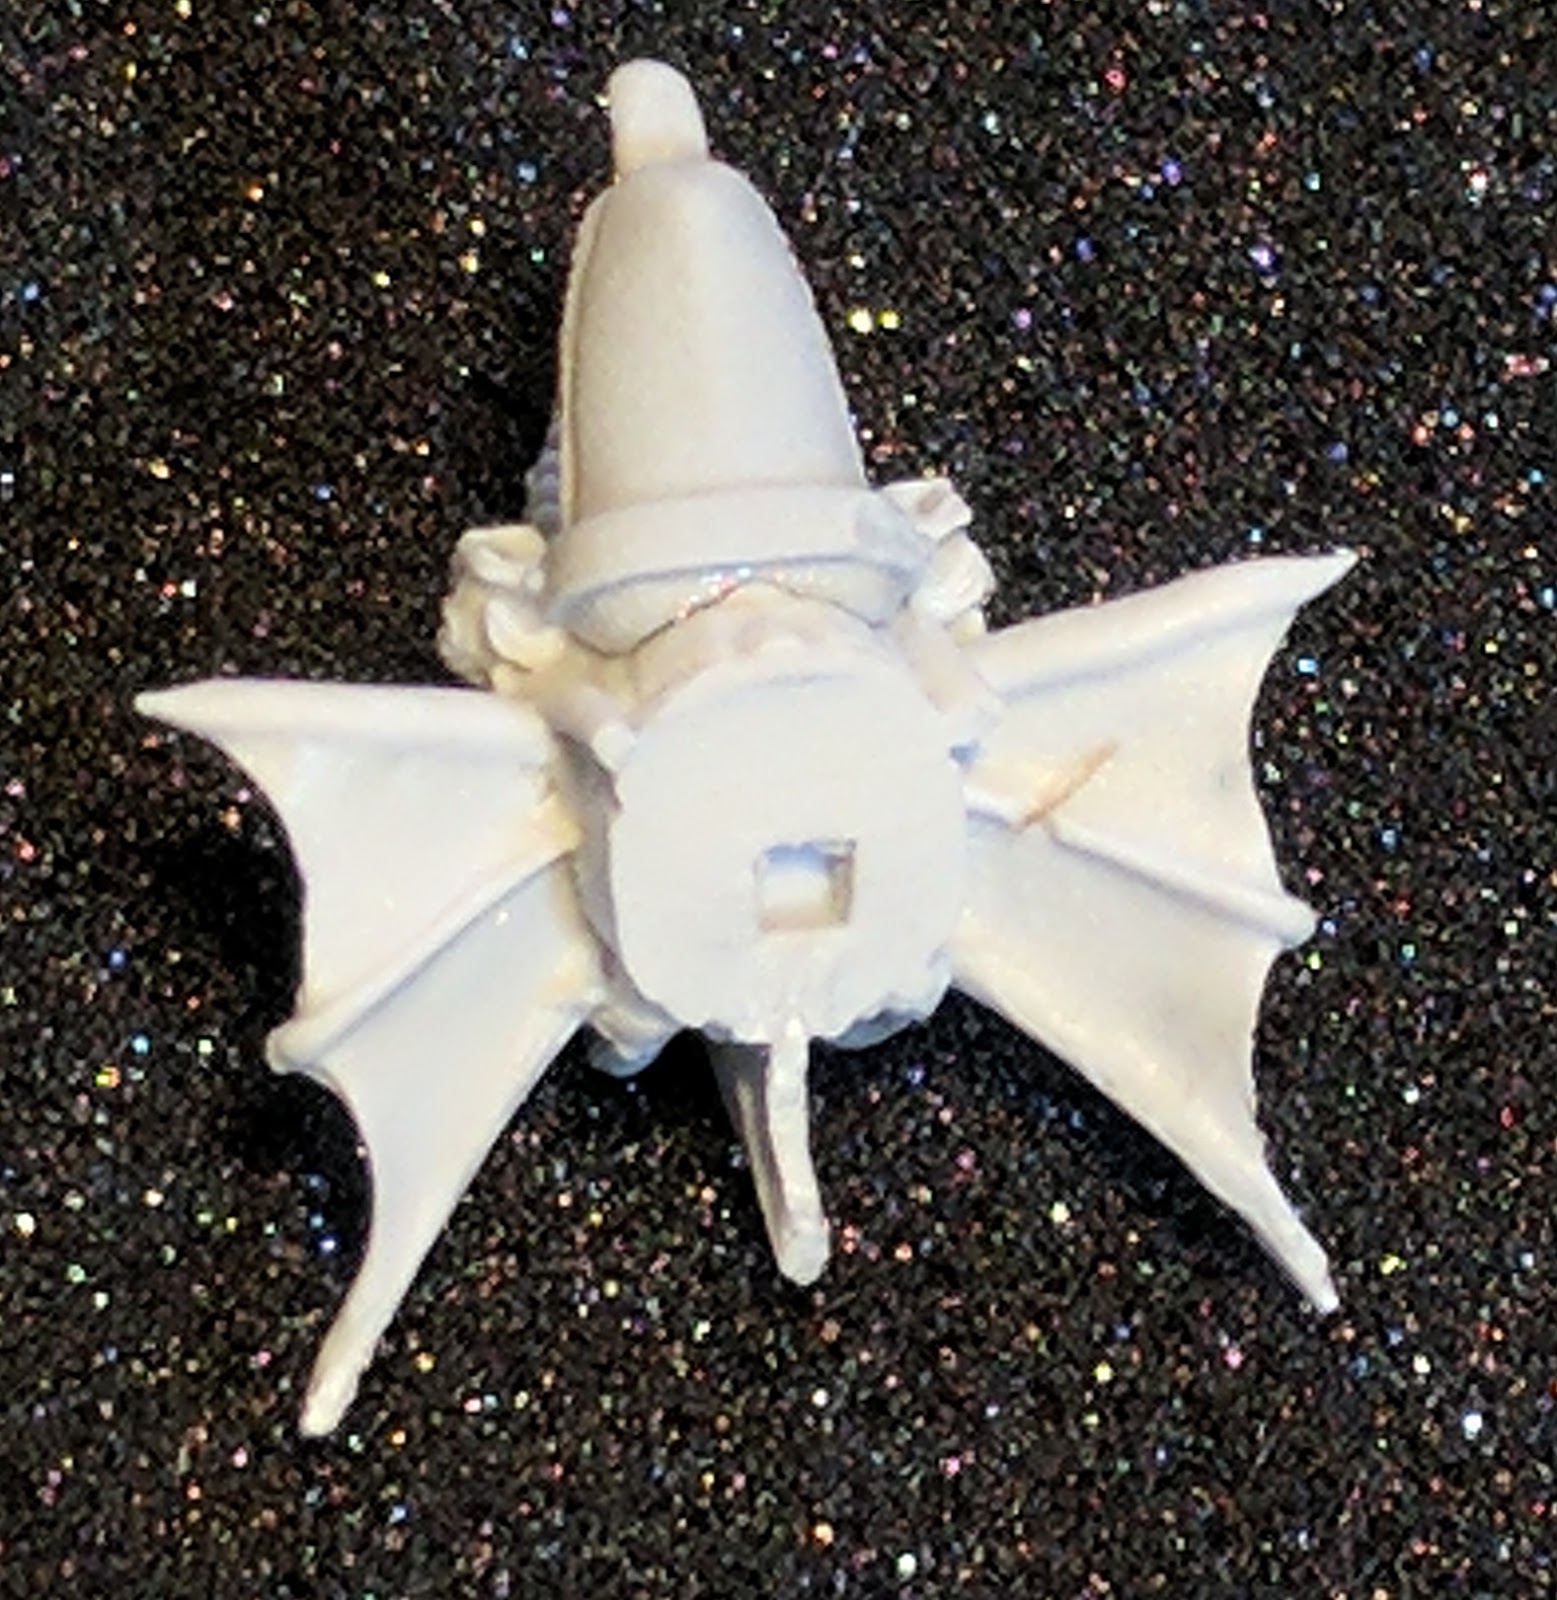
The back banner also held the spear arm (I assume), as it was also already broken off in the bag.
 |
| Yes, the banner is upside down, but it would look really weird if I rotated the picture to make it right side up - but have the 'sprue' on top. It would looks like 'Spider-Banner' hanging down from the ceiling |

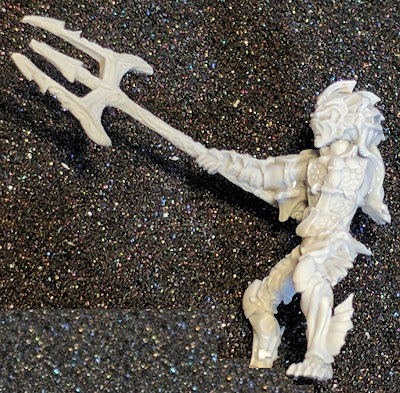
The Centurion's body and head


The shield and lower jar of the wyrm


and lastly, the spear arm


A new hobby knife blade and cleanup was quick and easy. All the parts laid out in approximate order for assembly.
This was actually easy to assemble, but only because it is the exact same configuration as the three other wyrmriders - tail, body, upper body, saddle, head. Most of the joins fit extremely well.

I did end up with one issue. I'm not sure if this was miscast or I'm just that sloppy. The body turned out to be hollow (no wonder it had no weight at all to it) - and when I clipped off the 'sprue', it ended up leaving a whole. I had hoped that this would be covered up by the base, but no - it is right in the middle. It looks like I'll need to get out some green stuff.
Then the spike on the 'collar' broke off - I tried to glue it back on, but as you can see - that failed (and the spike fell somewhere between my work desk and my light box (which is not on my game table in the basement - a much better location, but it does mean I have to carry everything up and down the stairs to take pictures in the box.

The next pictures are at my work space (ok, the dining room table next to my desk), so I used the foam insert in the packaging for a background. Trying to actually assemble models in the light box is not a great idea, and having it on the table leaves no room for anything else unfortunately.
So the first thing is gluing the jaw to the head.
Then the tail is glued to the body. Here is a closeup - you can barely tell where the joint is. The idea of putting the 'collars' to hide all the joints was great.
 |
| Good job of hiding the joint |
next, glue the upper body to the assembly - again they put a "collar" to hide the join.

Then the saddle. This is a bit weird at first, until you realize it is bending back over it's body.

Then the assembled head. This is the one joint that was not smooth - there was a square pin on the saddle side that didn't fit the square hole on the head. Plus while the back of the head was almost completely flat - the join on the saddle wasn't. I tried to trim the pin, and it turned out to have a bubble in it and broke in half, so I just cut it off completely and smoothed out the side as much as possible. This did leave a small gap (which may not even need filling)


The saddle has a hole to mount the banner in. I still haven't decided what to do about it (see below). The fins fit nicely on the sides.

Assembling the rider was also simple. The shoulder/arm joints were flat, allowing any position needed on the arms.

The head is a shallow ball/socket joint - just like every other Naiad (metal and plastic).

Then the shield fits on nicely (the right foot is actually there - I cropped out my finger holding the min :-) )

The rider then sits nicely atop he mount


And the banner slips right into the mount. However . . .

A comparison shot of the regiment w/ the hero. His mount is a bit taller, and the banner makes the miniature much taller.

The problem is the bins I used to transport everything are about 2" deep - and the banner (and his arm) will not fit.

The arm was easy to fix - a little super glue remover then re-do it pointing a bit downward.

The entire assembly took less than half an hour, including clean up. Very quick and easy, and not a pin in sight. Now of course we'll see if it holds up, but when I started putting the metal together without pins all the joints quickly broke.
You can see the greenstuff 'repairs' here. Because the body was hollow, I had to fill the hole, not just cover it up, to prevent the green stuff from leaving a concave indent when it dried.

I had thought about using a wax mold (like I did here) to recreate the spike - but then I couldn't find the molding wax. :-( So I tried to sculpt a spike - it is a bit thick but I hope it won't be very noticeable once I paint it up (kind of like putting makeup on a zit).

I do like the new pose for the arm - it lines up better with the head, and he now appears to be pointing his trident down at somebody from a superior position (both physically and (in his mind at least) status wise). Kind of a "bow down before me land dweller" vibe.

I put a long pin in the bottom of the banner pole, so it can be removed. I'm not sure a magnet would work well here, and you don't want it to rotate, so I want to keep the 'socket' intact. Plus it is always fun to watch some newbie grab the flag and pull it off, thinking they broke it (and then just slip it back in) :-)
 |
| This is actually a pretty tight fit, so no trolling new players with it. |
This was a fun model to assemble, and I look forward to painting it (once I decide on a color scheme for the wyrm). It is a little unfortunate that this is going in a demo army, as it deserves a premium paint job (I'd love to see what Claudia Zuminich, Brandon Palmer or James Wappel could do with it).
Now I don't want Mantic to waste any of their product development money, but it would not be a bad thing if the metal molds for these wyrm riders were to wear out quickly, just so we could get resin versions. I work in the computer industry, and we have NEVER heard of laptops being accidentally dropped (or run over by a car) when they weren't working well but were not yet up for replacement (no, I have never done that, though I did once accidentally spill coffee into one of mine). Not that I am asking for any harm, but accidents do happen, and the resin model is so much superior (weight, ease of assembly) to the metal that even with the brittleness I would almost buy a new regiment of these just to get resin and resign the metal ones to the big bin of unpainted miniatures. Almost.
Because it is all fun and games . . .
Comments
Post a Comment