Here in the US, today is Thanksgiving - the annual holiday celebrating gluttony and football. One of my favorite holidays actually (much less pressure than Christmas to do it right), but I couldn't resist the pun (I actually delayed this post for about two weeks).
When you think of Forge Fathers (and who doesn't spend their days thinking of Forge Fathers after all?) you think of armor - and armor naturally means Tanks! Sure they have the little Hultr Half-Track but when you just need superior firepower as well as the best defense in the game (the Brandr Urban Assault Vehicle is Def 10+) there is nothing like a real tank.
Of course I got three of them with the kickstarter. Of course it all comes in a bag, and takes a bit to figure out. The Forge Fathers have three full size tank variants (one of which has two weapon options) - and all of these can be built with this kit.
If you want to commit to a specific variant, you should decide that first. If you are like me and want the ability to field any of them, then there are some pieces you won't glue on. Also if you only want one version for sure, then you don't have to assemble the weapon options you are not using, in case you want them later for other conversions.

I decided for a slightly different take this time - so instead of showing you all the components at once, I'll show each subsection and how to assemble them. There are just so much stuff here that three or four pictures of everything together really isn't going to be useful.
So, in no particular order, we'll start off with the weapons, and the first one is the Heavy Dragonbreath Flamer from the Brandr Urban Assault Vehicle.

This is straightforward to assemble. Glue the tank to the top, and the barrel to the inside of the bottom half of the turret.

Then glue the two halves together, and you have a Heavy Dragonbreath Flamer

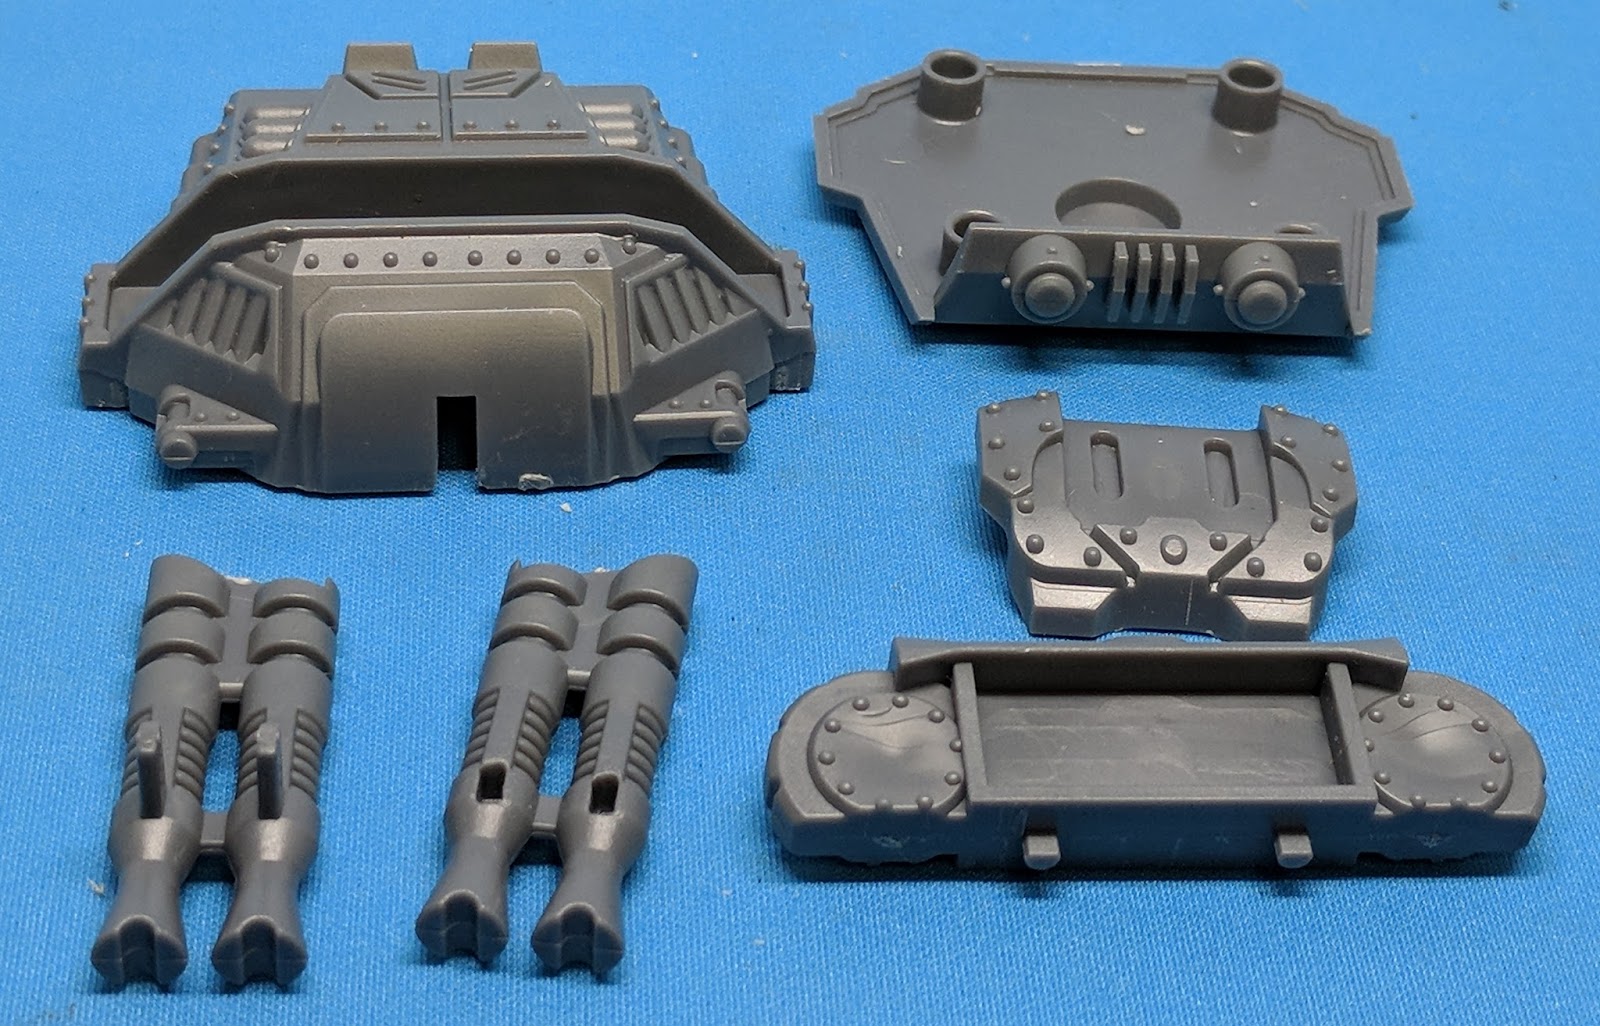
Next is the Heavy Magma Cannon - from the Sturnhammer Hata Pattern Battle Tank. Again it is a top and bottom half, as well as jets and heat sinks.

First the halves go together

The the jets fit into the front. They only fit in one way

Then glue the heat sinks to the appropriate slots on the top.

The Sturnhammer Hagall Pattern Battle Tank has a heavy hailstorm cannon, which was slightly trickier to figure out.

First glue the top and bottom halves together. What I initially assumed was the front is actually the back.

Next, fit the ammo cannisters into the large slot in the top. This is a very tight fit, and again only connects one way.

The gun mount plate then fits into the slot on the front.

The two sets of barrels fit easily together

and then fit onto the mount plate. Now you have all the turret options done for the two tanks (the transport does not have a turret). Set these aside for now.

The main body of the tank is identical for all variants. I broke the components into two shots, because the body and main armor were so big. So here are the treads, sides and auxiliary armor (it is actually a bit challenging to have to come up with names for all these pieces, since there are no instructions)


The body and main armor have matching oval connectors. You will glue these together, and make sure the armor fits snugly onto the body.


The tank treads fit easily onto either side (the connectors have a flag edge to make sure you don't put them together backward. Just to be sure, the sloped end goes toward the front, the round end to the back.

Then the sides fit on. There is a connector on the body that fits on each side - which is the only actual place that these pieces meet.

The auxiliary armor fits between the main armor and the sides.

There are two tabs on the bottom of each piece that fit between the tabs sticking out on the main armor.

Once you have these in place, the main tank body is done.


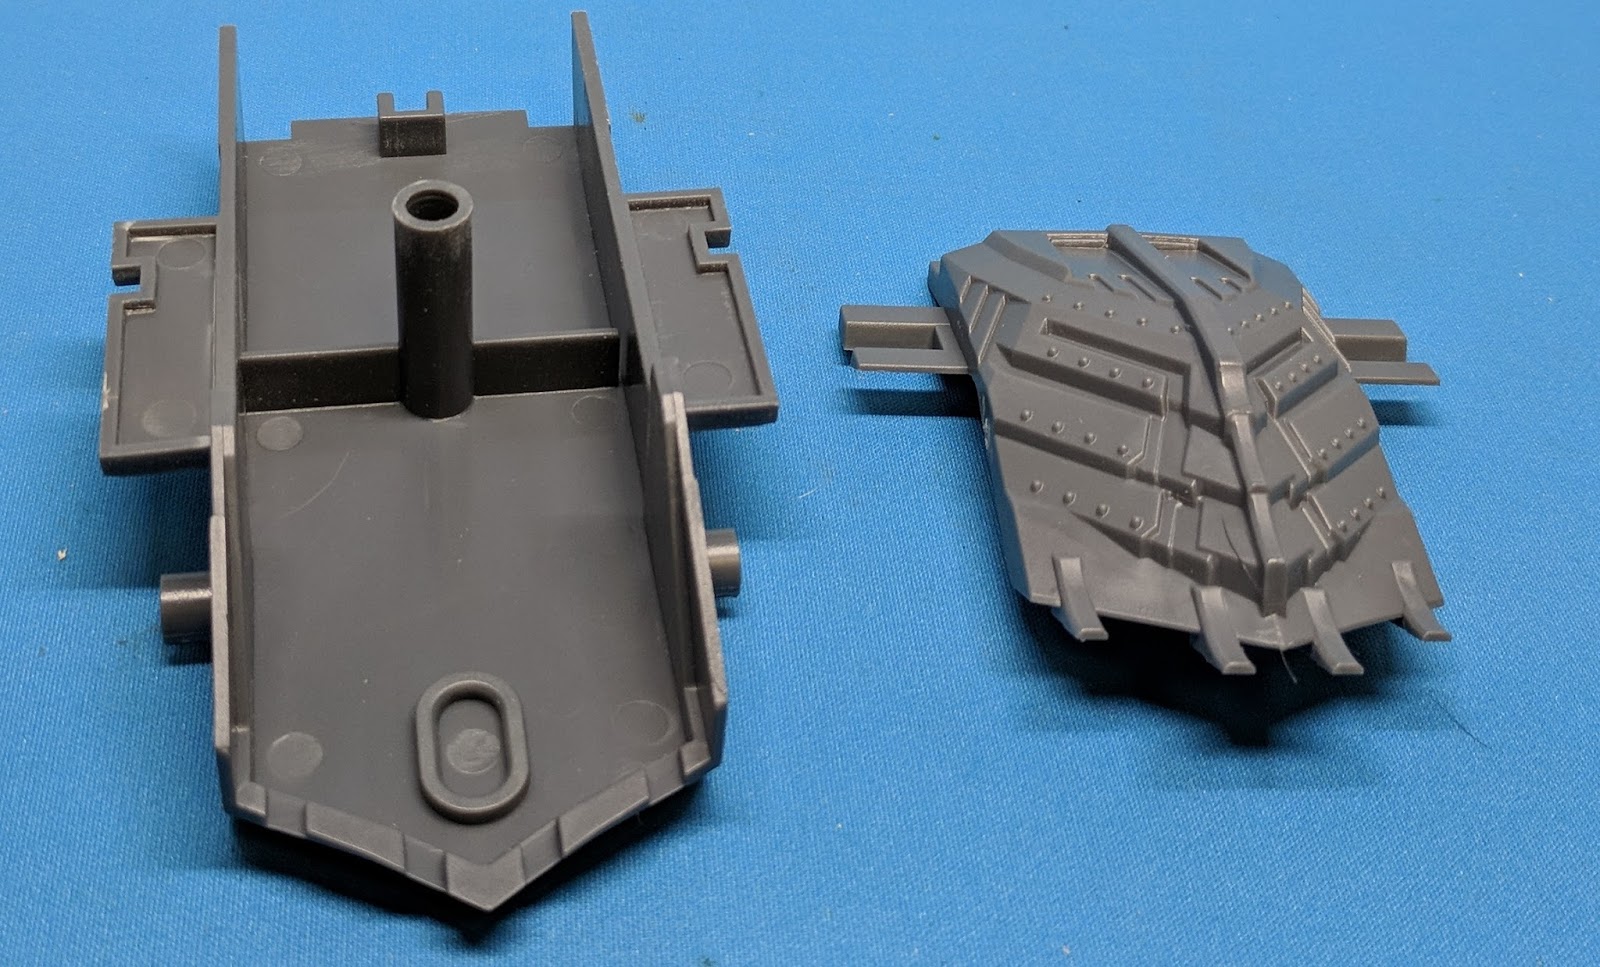
So next we start on the Drakkar APC (Armored Personnel Carrier) (Because we have already built the big guns, so we don't want to actually use them first or anything. Actually, you can do variant first). Now is the time to actually make some decisions. I made mine so I can do any of the four variants - if you are committing to the one then you can go ahead and glue the top and back on and be done.

First up is gluing the tiny gun barrel to the front of the little turret. This is the smallest piece of the entire kit.

Next we glue the back to the top. These fit fairly snugly together, and should to at right angles. The narrower end of the back goes toward the bottom.


Then glue on the corner supports. These only fit one way, and attach to the tabs on the back.

Then we attach the back half to the main body. There is a round post that that fits into a larger post on the body, as well as a square notch to fit the notch on the back. In addition, there are tabs on the back of the main body that fit the corner supports. I suggest putting the bottom tab in place then pushing the top down.

You may need to put a little pressure and maneuver the two large pieces around, but they do fit together. Make sure there are no gaps. If all you want is the APC, you can actually glue this in place. If you want to able to switch - well DO NOT glue it. It fits well enough it is never going to accidentally fall off.

Now we glue the little turret and viewport on. The key here is to only put glue on the back of the turret, NOT THE BOTTOM (again if you are swapping out). You only want to glue it to the top, no the main armor piece.

I glued the viewport to the turret - making sure the backs lined up straight.


Then fit the turret against the top. Glue it to the top only.

And the Drakkar APC is done.

Once the glue sets, you should be able to remove the top (with the turret) and back. It will take a little prying, but is not actually difficult.

The other variants use the same top, rear and corners.

Again, the top and rear go together at a right angle on the longer sides.


The two corner braces then fit against the rear section with a slight overhand on the top

Once dry you can put it in place.

Just like the APC top, this fits onto the main body with a little pushing.


I did find that the three turrents don't want to just sit in the hole - so I magnetized them in the exact same way I did for the half-track. A small piece of tin on the inside of the hole in the top, then a neodymium magnet on each turret.


I used 1/16" magnets and they fit perfectly

So now you can do both the Strumhammer tanks - the Hata Pattern (with the Heavy Magma Cannon)

or the Hagall Pattern (with the Heavy Hailstorm Cannon)

I wanted to do a size comparison between the two tanks and their Magma Cannons

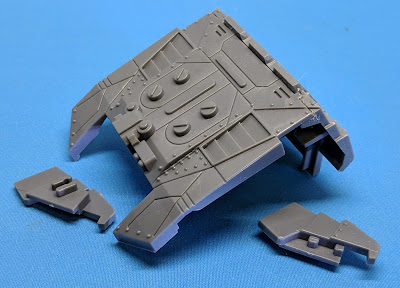
The final variant is the Brandr Urban Assault Vehicle. This has an extra point of defense because of the big assault ram providing extra protection on the front.
This comes in three pieces

Simply glue the edge pieces (with the rivets facing out) to either side of the blade


Now, if all you want is the Brandr, simply glue this to the front of your tank via the two pegs on the back that fit against the two corners, and glue the Heavy Dragonsbreath Flamer in the turret position.
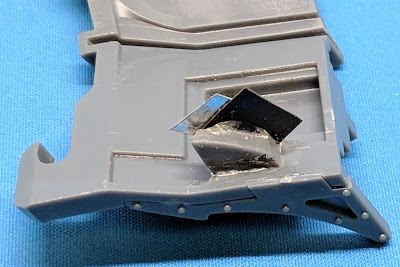
If you want to be able to swap this out- well that is a bit more difficult. This only attaches via two small pieces, and will not simply sit in place. It makes it rather hard to magnetize (and you definitely will have to magnetize (or do something to allow this to stay in place yet be removable).
I see two options. One would be to make two long pins that could either to into holes in the body (which compromises the integrity of the tank - can't have that) or that could go into aluminum tubes glues in place (same thing, but might look better.
The other option is magnets again. One would be to put magnets directly on the skids, but those just seem a bit in the way - I like to have my magnets as hidden as possible when not using them.
So my solution has been to drill two holes to offset the magnets into the front of the skids on the inside. Originally I was going to then glue a small piece of tin on the inside of the scoop that would line up with the magnets, but I couldn't get that to work after several tries.

I also tried small pieces of sprue, but couldn't get them to line up properly. I finally used a small piece of 'rubber steel' - a magnetically receptive plastic strip (I had some left over from GF9 when I used to use their magnetic bases.

This was flexible enough to fit, and then I added a bit of tin to back it up. The thing that is a little different is I glued the non-sticky side to the scoop, then the tin on the sticky side. This actually, finally worked.
It isn't fancy, and from the bottom looks kind of crappy

The key is, however, that it holds

Plus, the part that anyone can see looks fine.
So the Brandr Urban Assault Vehicle is finally completed.

This single kit ends up with a lot of variable components.

I wanted to do some size comparisons against the Veer-myn tunneler. They are both about the same 'footprint', but the tunneler is much taller


So again, a nice kit that isn't horribly hard (well except for the Brandr blade - there should have been a stronger connector for it in this kit because people are going to want to have it removable).
I would think they should have made a single tank (not including the APC) - then have the option to upgrade with the front blade (for another 20 pts), and give it the the option to take any of the three weapons (for some set price - so the Hailstorm Cannon is the default (for free), upgrade to Magma Cannon for 20 pts, or the Dragonsbreath Flamer for 20 pts). But that is just me I guess.
The kit itself is great, an a pretty nice tank - ready to roll over just about anything on the battlefield.
To finish up, all four of the wave 2 Warpath vehicles.

Because it is all fun and games . . .
When you think of Forge Fathers (and who doesn't spend their days thinking of Forge Fathers after all?) you think of armor - and armor naturally means Tanks! Sure they have the little Hultr Half-Track but when you just need superior firepower as well as the best defense in the game (the Brandr Urban Assault Vehicle is Def 10+) there is nothing like a real tank.
Of course I got three of them with the kickstarter. Of course it all comes in a bag, and takes a bit to figure out. The Forge Fathers have three full size tank variants (one of which has two weapon options) - and all of these can be built with this kit.
If you want to commit to a specific variant, you should decide that first. If you are like me and want the ability to field any of them, then there are some pieces you won't glue on. Also if you only want one version for sure, then you don't have to assemble the weapon options you are not using, in case you want them later for other conversions.

I decided for a slightly different take this time - so instead of showing you all the components at once, I'll show each subsection and how to assemble them. There are just so much stuff here that three or four pictures of everything together really isn't going to be useful.
So, in no particular order, we'll start off with the weapons, and the first one is the Heavy Dragonbreath Flamer from the Brandr Urban Assault Vehicle.

This is straightforward to assemble. Glue the tank to the top, and the barrel to the inside of the bottom half of the turret.

Then glue the two halves together, and you have a Heavy Dragonbreath Flamer

Next is the Heavy Magma Cannon - from the Sturnhammer Hata Pattern Battle Tank. Again it is a top and bottom half, as well as jets and heat sinks.

First the halves go together

The the jets fit into the front. They only fit in one way

Then glue the heat sinks to the appropriate slots on the top.

The Sturnhammer Hagall Pattern Battle Tank has a heavy hailstorm cannon, which was slightly trickier to figure out.
First glue the top and bottom halves together. What I initially assumed was the front is actually the back.

Next, fit the ammo cannisters into the large slot in the top. This is a very tight fit, and again only connects one way.

The gun mount plate then fits into the slot on the front.

The two sets of barrels fit easily together

and then fit onto the mount plate. Now you have all the turret options done for the two tanks (the transport does not have a turret). Set these aside for now.

The main body of the tank is identical for all variants. I broke the components into two shots, because the body and main armor were so big. So here are the treads, sides and auxiliary armor (it is actually a bit challenging to have to come up with names for all these pieces, since there are no instructions)

The body and main armor have matching oval connectors. You will glue these together, and make sure the armor fits snugly onto the body.


The tank treads fit easily onto either side (the connectors have a flag edge to make sure you don't put them together backward. Just to be sure, the sloped end goes toward the front, the round end to the back.

Then the sides fit on. There is a connector on the body that fits on each side - which is the only actual place that these pieces meet.

The auxiliary armor fits between the main armor and the sides.

There are two tabs on the bottom of each piece that fit between the tabs sticking out on the main armor.

Once you have these in place, the main tank body is done.


So next we start on the Drakkar APC (Armored Personnel Carrier) (Because we have already built the big guns, so we don't want to actually use them first or anything. Actually, you can do variant first). Now is the time to actually make some decisions. I made mine so I can do any of the four variants - if you are committing to the one then you can go ahead and glue the top and back on and be done.

First up is gluing the tiny gun barrel to the front of the little turret. This is the smallest piece of the entire kit.

Next we glue the back to the top. These fit fairly snugly together, and should to at right angles. The narrower end of the back goes toward the bottom.


Then glue on the corner supports. These only fit one way, and attach to the tabs on the back.


Then we attach the back half to the main body. There is a round post that that fits into a larger post on the body, as well as a square notch to fit the notch on the back. In addition, there are tabs on the back of the main body that fit the corner supports. I suggest putting the bottom tab in place then pushing the top down.

You may need to put a little pressure and maneuver the two large pieces around, but they do fit together. Make sure there are no gaps. If all you want is the APC, you can actually glue this in place. If you want to able to switch - well DO NOT glue it. It fits well enough it is never going to accidentally fall off.

Now we glue the little turret and viewport on. The key here is to only put glue on the back of the turret, NOT THE BOTTOM (again if you are swapping out). You only want to glue it to the top, no the main armor piece.


Then fit the turret against the top. Glue it to the top only.

And the Drakkar APC is done.

Once the glue sets, you should be able to remove the top (with the turret) and back. It will take a little prying, but is not actually difficult.

The other variants use the same top, rear and corners.

Again, the top and rear go together at a right angle on the longer sides.


The two corner braces then fit against the rear section with a slight overhand on the top

Once dry you can put it in place.

Just like the APC top, this fits onto the main body with a little pushing.


I used 1/16" magnets and they fit perfectly

So now you can do both the Strumhammer tanks - the Hata Pattern (with the Heavy Magma Cannon)

or the Hagall Pattern (with the Heavy Hailstorm Cannon)

I wanted to do a size comparison between the two tanks and their Magma Cannons

The final variant is the Brandr Urban Assault Vehicle. This has an extra point of defense because of the big assault ram providing extra protection on the front.
This comes in three pieces

Simply glue the edge pieces (with the rivets facing out) to either side of the blade


Now, if all you want is the Brandr, simply glue this to the front of your tank via the two pegs on the back that fit against the two corners, and glue the Heavy Dragonsbreath Flamer in the turret position.
If you want to be able to swap this out- well that is a bit more difficult. This only attaches via two small pieces, and will not simply sit in place. It makes it rather hard to magnetize (and you definitely will have to magnetize (or do something to allow this to stay in place yet be removable).
I see two options. One would be to make two long pins that could either to into holes in the body (which compromises the integrity of the tank - can't have that) or that could go into aluminum tubes glues in place (same thing, but might look better.
The other option is magnets again. One would be to put magnets directly on the skids, but those just seem a bit in the way - I like to have my magnets as hidden as possible when not using them.
So my solution has been to drill two holes to offset the magnets into the front of the skids on the inside. Originally I was going to then glue a small piece of tin on the inside of the scoop that would line up with the magnets, but I couldn't get that to work after several tries.

I also tried small pieces of sprue, but couldn't get them to line up properly. I finally used a small piece of 'rubber steel' - a magnetically receptive plastic strip (I had some left over from GF9 when I used to use their magnetic bases.

This was flexible enough to fit, and then I added a bit of tin to back it up. The thing that is a little different is I glued the non-sticky side to the scoop, then the tin on the sticky side. This actually, finally worked.

It isn't fancy, and from the bottom looks kind of crappy

The key is, however, that it holds

Plus, the part that anyone can see looks fine.
So the Brandr Urban Assault Vehicle is finally completed.

This single kit ends up with a lot of variable components.

I wanted to do some size comparisons against the Veer-myn tunneler. They are both about the same 'footprint', but the tunneler is much taller


So again, a nice kit that isn't horribly hard (well except for the Brandr blade - there should have been a stronger connector for it in this kit because people are going to want to have it removable).
I would think they should have made a single tank (not including the APC) - then have the option to upgrade with the front blade (for another 20 pts), and give it the the option to take any of the three weapons (for some set price - so the Hailstorm Cannon is the default (for free), upgrade to Magma Cannon for 20 pts, or the Dragonsbreath Flamer for 20 pts). But that is just me I guess.
The kit itself is great, an a pretty nice tank - ready to roll over just about anything on the battlefield.
To finish up, all four of the wave 2 Warpath vehicles.

Because it is all fun and games . . .
I read this article, it is really informative. Your way of writing and making your thoughts is very impressive. Thanking you for such an informative article. Magnet manufacturer
ReplyDeleteThanks!
Delete