 |
| The full version of my avatar |
Almost 10 years ago (September 17, 2005) (Wow, time does slip away, it does not seem like it was that long ago) I won a Confrontation Tournament at Wexford Hill Hobbies (which eventually became Krystal Keep, and is now gone). The prize was a resin Rackham Scourge Bearer Statue.
Now I'm no golden daemon winner - just an ordinary computer programmer who likes miniature games, and can manage to field a decent looking army on the table. But especially after winning a Best Appearance award at a Warhammer Rogue Trader Tournament on 10/01/05, I thought I would chronicle, in detail, how I painted this. I've since gone on to win several more best painted awards, including even one from Adepticon a few years ago (it was only for a 1000 pt tournament, but it was still winning at Adepticon!) and a General's Choice award from Buckeye Battles.
To start, this is the resin statue as shipped in 5 Parts. The first step is to wash the resin to make sure to remove any residue left from the casting, and then to clean up any mold lines that may be left.

The next step is to find a base. My two youngest sons got cookie bouquets for their birthdays from their mother, and they arrived on a round base, with slots to hold the dowels that the cookies were on. Turning this over, and it was an ideal base. (I have since replaced this base with a shorter wooden one (and a glass dome to protect it))

Two rectangular slots were cut using a dremel - these are to fit the large plugs on the feet. I figured it would be easier to leave these on as 'handles' and for mounting - and this way it was removable from the base until final assembly. A hole was drilled for a dowel to mount the doll (ok, so it took several tries to get it right).

I plugged the extra holes, then covered the top with sand. I used two layers of sand to give it better texture at this size. Then I spray primed (I like Rust-Oleum Painter's Touch grey primer) it and based it with flat black (again Rust-Oleum Painter's Touch flat black) spray paint. Just be extra careful that you shake this very thoroughly, as it can clump otherwise, which you won't notice on 'ground' like this, but will almost ruin a figure

The first coat of paint is a dark brown - it is actually house paint - Glidden Evermore "Stuart House Brown" - a very close match to Vallejo Game color #45 Charred Brown. (But it comes in quarts (like Elephants I hear :-) ) - I needed this much to build my game table, and have kept using it for bases ever since.

After that dries (and it does take a bit longer than normal figure paint), then drybrush with Vallejo #43 - Beasty Brown.

Then drybrush with Citadel Bubonic Brown

Final light drybrush with Vallejo #34 Bone White.

Finally, brush on spots of thinned white glue (the same used for the sand) and spread on static grass - shaking off the excess.

Now on to the actual statue. The arm was pinned on with 2 pins, and then green stuff was used to fill in the gaps. A pin was also put into the lantern, but this won't be glued on until it is painted. A dowel was inserted into the doll to hold it to the base as well.

Fully assembled, on a base. Ready for priming.

So how big is this thing? Here is a comparison with a confrontation card, and Varghar in front of the card. The box it came in is in the back. Now when you consider that most miniatures are between 1" and 2" high - this is huge.

Primed the model, using the same primer as for the base. Then did a basecoat of flat black. (Were I doing this now I would have used an ultra flat black primer) I posed it on the base just to see how it looks so far. I figure since I have the base, and made the statue removable, it makes sense to use it for the pictures.

Now I've started the basecoat. For the metal (mainly the weapon and the lantern) I used reaper Steel Plate. This is a very dull metal paint that should be good to build on (I'm thinking to go with brass for the lantern). The windows of the lantern got Citadel Blazing Orange (I want this to be glowing). Skin is starting out Vallejo Sombre Grey. I plan to highlight with blue for most of the skin, but grey for the skull plate. The skirt is Citadel Desert Yellow. The wood of the staff, what little there is, is Vallejo Charred Brown, and the belt & collar are Vallejo Beasty Brown.

From the back. The horns will get a base of Charred Brown. I'm not sure what colors I want to do the doll in yet - I'm thinking it is more scraps. And while I did base the diseased part of the skin the same, I plan to use reds, greens and purples to make it come out much more.

I like to do the entire basecoat first, then go back and do the shading and highlighting - so the basecoat is done. Lots of little bits of color now. The wrap on the staff is citadel Snakebite Leather. The bandages are citadel Kommando Khaki. The band-aids are Vallejo pale flesh (I want that look of when you put on a band aid, and it never matches skin tones :-) ). The rope is citadel sunburst yellow. The patch is citadel catachan green. Oh - and that is my son in the background, working on scratch building a wood elf treeman!

All the stitches and eyes are citadel bleached bone. The beards are citadel red gore. The horns are vallejo Charred brown.

I decided for the two dolls that I wanted more of a rag doll effect - where they were made of different scraps. For the one on his back, the body is catachan green, and the left arm and heart are citadel red gore. The cloak on the doll is citadel hawk turquoise, and the rope is once again sunburst yellow. The right arm is citadel bubonic brown, the right leg is citadel vermin brown, then the left leg is citadel midnight blue. The head on the belt, and the stuffing in the arms and legs are all vomit brown. The teeth are bleached bone, the tongue red gore, and the jawplate citadel rotting flesh.

I also realized that I had missed the body of the other doll - this is actually skin with pieces sewn on - so he got vallejo sombre grey, like the rest of the skin. The back of the doll is actually citadel desert yellow - the same as the skirt though it doesn't look it. The right leg is vomit brown, and the left leg is a vallejo red - but I don't know the color - somehow we got a bottle with the writing on the label (both name and number) completely worn off. The dolls right arm is snakebite leather, and the left arm is citadel vermin brown.

For my base shading, I like to use a black wash over everything. This may not work for a model that would have a clean, crisp paint job, but dwarves always have a bit of that gritty feel to them. I really like how it starts to bring out the details.

And from the back. For the wash I use black ink, water, and a little bit of Future floor wax - this helps the wash to stay in the cracks when it dries - otherwise instead of going in the recesses it could leave rings around them, which is not what you want at all.

Now to start the highlights. First, another thin coat of citadel blazing orange inside the windows on the lantern, leaving a little of the darker (from the wash) at the edges. Then a light coat of citadel dwarf bronze on the lantern and the ring. For the skull plate, a mix of 3-1 vallego sombre grey to citadel codex grey was applied.

For the skin, a 3-1 mix of sombre grey to vallejo magic blue. The hornws got a light coat of valeggo beasty brown. The bandages got another light coat of kommando khaki, and the skirt a highlight of more desert yellow. For all the diseased spots, and all the joints where pieces had been sewn together (his lips, the skull plate, and the doll) a thin wash of citadel red gore was applied both in the joint and where the stitches were pulling the skin. The stitches were also given another coat of bleached bone, as some of the skin and red had gotten on them


Next, a 1-1 mix of fiery orange and sunlight yellow applied to the center of the glass. The metal received a very light drybrush of citadel mithril silver.

Next was sunburst yellow in the center of the glass.

A dot of skull white was put near the top of the curve of the glass. Citadel chaos black was used to re-draw the cracks in the glass, and a touch of skull white was applied next to the cracks to enhance them.

Lastly, a coat of gloss clearcoat was applied to the glass. This is something I got from armorcast - but it smells just like future floor was, and has the same consistency, and works just the same - so I suspect that is what is in this little bottle (with the hand typed label and all). So I figure the lantern is now done.

Now the highlight on the head, specifically the skull cap. But first finish the horns with a final highlight of bone white. The first highlight for the skull was a 1-1 of vallejo sombre grey and citadel Codex Grey. And one note - citadel and vallejo game color paints DO NOT mix well - especially when thinned. So I'm planning on migrating completely to vallejo - but I'm not going to throw out what the citadel paints I already have.

Then a 1 - 3 mix of sombre grey to fortress grey.

Next a thin coat of codex grey.

A 1-1 mix of codex grey to fortress grey.

Finally, a last thin coat of straight fortress grey. One note - highlighting such a large blank area is a bit of a challenge - things a bit easier with SOME kind of texture to give you shading.

Ok, the first 'setback'. This took several tries to get any kind of color I liked on the skin. The base was sombre grey - a bluish grey. I wanted the skin to be more blue, but not a bright blue. The first highlight was to mix in magic blue. I tried to add more - a 1-1 mix, and it was way too blue. It turns out that vallejo electric blue is a much better mix to get what I wanted. So this is 1-1 sombre grey to electric blue for highlight.

I'm not sure how much it shows, but the back shoulders are where the attempts at other colors went. Not quite sure if I need another highlight on the skin or not - I don't want to get too blue or too light. A bit of a quandary.

I did the skin of the doll with the same mix.

Add another highlight to the skin - this one using a 1 - 3 mix of sombre grey to electric blue. This was mainly put on the facial details, and the hands. Afterward I realized that the dolls lips should appear chapped and split, so I washed them in blood red, and then re-highlighted them with the same mix.
The metal on the belt and the locks was then highlighted using citadel chainmail. I also did this to the blade, but didn't like the result - for the way it is eaten away it was simply much too clean. I also added a highlight of catachan green to the patch, and gave the skirt another highlight of desert yellow.

The bandages received a highlight of bleached bone.

The wrap on the staff got a highlight of citadel snakebite leather. The fingernails got a base of codex grey, then an arc of fortress grey (you know, that lighter part of you nail at the back). Finally, I used straight black to line the edge of the nails and add some chips and cracks. That was something that bothered me about the sculpt - this rotted, possessed dwarf who looked like he had a manicure.


Next was to stipple the blade using charred brown. Stippling is done by cutting a VERY old brush down to about a quarter of an inch of bristles. You then get paint and wipe it off (like overbrushing) and dot the surface with the color to give it a random pattern. This can also work well for painting camo patterns as well as rust.

Next, stipple the blade with beasty brown and parasite brown. Unfortunately I did this backward, but since it is a random pattern it still works ok.

The last stipple was with citadel fiery orange.

The next step is to drybrush chainmail over the entire blade. This affect leaves the ruse in the dents and grooves, but not on the areas that tend to get scraped clean by use.

Next I decided to detail the sores. First, I repainted them with citadel dark angels green. I had thought to do them originally in reds and blues and purples, but I think the green ends up with a more diseased look that I want.

Then I added citadel red gore into the recesses where I wanted to show the open sores.


I used citadel catachan green for the first highlight, and then a 1-1 mix of catachan green and citadel rotten flesh for the next. Finally, the blisters were picked out in rotten flesh.

Then a final thin black wash to darken the area a bit and make it look a bit more rotten and diseased (it was looking a little too clean for me).

More highlights. Snakebite leather was used on the staff, as well as the arm of the doll. Bubonic brown on the doll leg over the vomit brown - I wanted this to be the color of the end of the arms and legs instead. Vermin brown on he doll arm. Beasty Brown on the collar and belt. The a mix of vallejo cobra leather & plague brown (vallejo is much easier to mix as you can measure a drop at a time) 2-1, then 1-1, then straight plague brown.

Vomit brown was used on the ends of the dolls arms and legs, as well as the doll head on the belt. Red Gore on the doll leg, arm and heart. I didn't like the color of the doll body on his back, so I lightened it with a mix of 2-1 catachan green to goblin green, then a 1-1 mix. Desert yellow was again applied to the skirt and the hump of the doll.

More highlights. Once more I went over the stitches with bleached bone. These seem to be a magnet for needing corrections - every time I look at them I find more places to fix on the stitches *sigh*. The beards were both given a coat of vallejo scar red.

The bone fragments in the dolls arms got bleached bone. Citadel hawk turquoise was used as the first highlight on the dolls scull cap and the others cape. Midnight blue on the doll leg as well.

Bone white was used to highlight the bandages on the feet, stomach and chin (I had already done this on the arms, but realized I missed it here). I was also concerned that the skin was too 'bright'. I tried a thin wash, but it didn't help. Then I put a very very light drybrush of sombre grey on the skin - and this helped to dull down the brightness a bit.

I didn't like the band-aids either - too bright. So I re-did them in elf skintone, and then a highlight of pale flesh, and I think the look better. Citadel vomit brown on the doll head hanging off the belt, and bloody red on the tongue

A 3-2 mix of hawk turquoise to white was used as a highlight on the doll skull cap and the cape. At this point I also did some touch ups on the skin, using a 1-1 sombre grey and electric blue mix. I used parasite brown to highlight the collar end belt edges, and a 1-1 mix of cobra leather and plague brown for the dolls right arm.

I then used this mix and combined an equal amount of parasite brown to do the right leg and left arm of the two dolls. Scar red was used as a highlight of the heart, left arm and right leg. I was having a real hard time thinking of a good highlight for the skirt, then I hit upon 1-1 mix with kommando khaki - I used this on the skirt and the hump, and especially the worn areas of the skirt.

I used a 6-1 mix of catachan green to white to highlight the patch on the skirt. And I did a black wash over the bandaids. Then I started on the eyes. It took several tries to mix a shade I liked, but finally a 1-1 black to magic blue mix worked for the iris.

Then I used straight magic blue to add some lines to the eye since eye colors are not solid.

Then a circle of black for the pupil.

Bloody red was used to draw the lines to make them bloodshot. For the two 'good' eyes I then put on a gloss clear coat. On the right eye, I wanted to make this with a cataract, so I used a thin wash (4-1 water) of bonewhite. This will require several more coats yet to get the full effect (I just want to be able to see the color within the bad eye) (and yes, I did not want them looking in the same direction.)

I used a mix of parasite brown and scar red on the beards, then a final highlight of parasite brown. I added a few more coats of the thin bonewhite wash to the right eye. The other 'good' eyes got a dot of skull white in the corner of the pupil.

Mithril silver was used as final highlight to the metal pieces on the belt. Rotting flesh was used on the jawplate of the doll head. Elf skintones were added to the bandaids.

At this point, I don't have much left to do (that I know of). I want to add a bit of a glow from the lantern on his left leg (and maybe extend it a little to his right knee and the staff).

Opinions are not only welcome, but currently encouraged.

Final touch ups. To give the muscles on the back and arms a bit more definition, I added some shading using a 2-1 vallejo magic blue to hot orange mix.

To give some glow to the lantern, I used a very thin (3-1) layer of citadel hot orange on his left leg and foot, as well as a little on his right knee and the staff. Then a 3-1 layer of sunburst yellow.

The doll cape required a touch up of 3-2 white to falcon turquoise

The heart needed a touchup of citadel red gore.

To give some definition to the veins in the hands, I first tried a bit of blue, then purple. I didn't like either.

So I used blood red instead. Then I did a light dusting of 3-1 electric blue to sombre grey over the hands again.

I realized that the bandages were actually only modelled on the front of the feet - the heels were bare. So these were re-painted as skin using the previous techniques (there is something to be said for documenting every step!)

I then attached the chain, after giving it a wash of dark angels green. I changed the metal on the links attaching the chain to more match the chain, using the citadel dwarf bronze, then a dark angels green wash, then a very highlight of mithril silver.

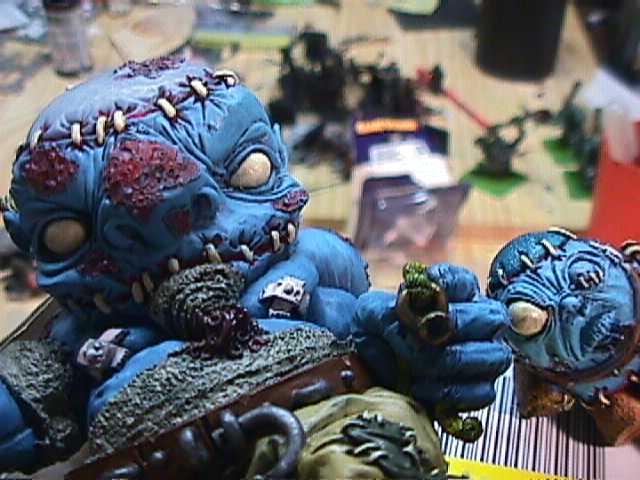
A close up of his face.

And one of the canopic doll.

And the full figure. One more thing is needed - I want to get a name plate for the base - that will take a bit of time to find a local place to make one.

Because it is all fun and games . . .
Comments
Post a Comment