In our modern world, it seems like everything is getting faster and faster. From cell phones to internet connections (and for some those are one in the same) faster is better.
But not always. Specifically, when pinning miniatures, faster is NOT better. Because faster results in more friction, which builds up heat, which expands metal, which then breaks bits (in the perfectly placed hole you are attempting to drill) which leads to anger, which leads to hate, which leads to suffering, which leads to horrible prequel movies.
However, not everything is better by hand either. As you get older (and that is something nearly everyone will do, like it or not (and it beats the only current alternative after all)) doing things completely by hand becomes more difficult.
I've found a handy little solution. The battery operated Tamiya 74041 Electric Handy Drill turns out to be just the thing. There is a nice web page (from a railroad modeler) that showed me how to do everything here.
 I ordered this from Amazon, and was very pleasantly surprised to have it arrive in only 2 weeks from Japan.
Inside the slightly beatup, bubble wrapped box were three colored plastic sprues, and a small bag of metal parts.
The blue sprue was the shell for the tool, the orange sprue was the gears, and the gray sprue was the internal parts.


The sprues were clearly labeled for the parts.

The assembly instructions were all pictures and were fairly clear, though they did not necessarily do a good job in indicating sequence of assembly in a given section.
So first you put the batter contacts on the appropriate holder

Then click the motor into place


The kit comes with a small tube of grease (which appears to be petroleum jelly) - the instructions clearly show where to make sure you apply grease

the trigger pieces are assembled into the frame

This includes the chuck lock and trigger lock (which should be assembled before the trigger, as the trigger gets in the way of putting in the trigger lock.

The chuck lock is a metal button/pin that fits into a slight hole in the driveshaft to keep it from moving when you tighten the chuck. The trigger lock simply blocks the trigger from being pressed.

The gears go together easily, and when putting them into the handle it becomes obvious what goes where. All the gears get grease as well as the drive shaft.


The motor/battery contact the slips into place, and the bottom contact is held in place by another plate (that is held in place by the outside screws. Putting in the bottom battery contact was not obvious how it fit, and the trigger pin did not want to go into the place, but after a little work and a test fitting of the batteries it wasn't too bad, and it all worked first time!

The outer shell is held in place by four screws. These were tapping screws, so were a bit more difficult to get in all the way (yea for cordless screwdrivers)


It comes with two collets. Unfornately both of these are larger than I want to use, as like the 1/32" bits and wire for pinning.

There are a few of solutions to this. One is to wrap a bit of tape around the bit.

You won't be able to fit the tape into the front end of the collet, so slip the bit in through the back
 and pull it out the front, the slip the
 then put the collet in the spindle and tighten the collet nut


This works ok for softer materials (like plastic).

However it doesn't provide a tight enough grip for anything harder (such as pinning metal).
A second solution is to get bits with a wider shaft than the bit. So instead of a 1/32" shaft you can get a 1/8" shaft for a 1/32" bit - these are available on eBay (I found them as low as $1.40 for 10 with free shipping from China here).

However I had just recently bought a couple of years supply of normal ones, so I wanted to still be able to use them.
I picked up a dremel 1/32" collet (part number 483) (ok, I actually picked up a set of collets and nut because my local Home Depot did not have the single one).

This fits the drill bit perfectly, however it doesn't fit the the drill spindle very well - so when using it it can wobble a little.
On solution here is to simple wrap the end of the collet with tape so that it fits the spindle better. It doesn't have to be an exact or tight fit, so this is adequate.
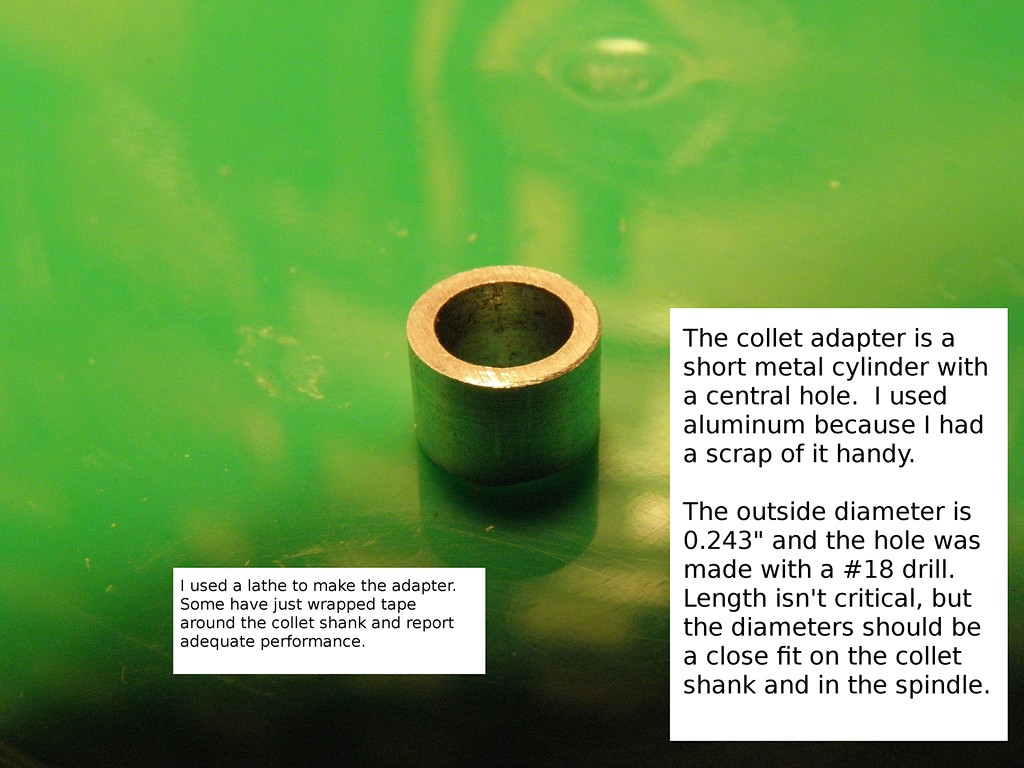
The other solution is to create an adapter ring. The web site mentioned that he made his out of scrap aluminum - I don't have any nor good metalworking tools.
However while walking the dogs tonight, I thought to myself, "self" "what is that voice?" "oh yeah, just me" (not the usual voices in my head). "You can make a wooden adapter." I got a little wrapped around the axle seeing the precise measurements until I checked - and yes it was a 1/4" opening in the shaft, and my dremel collets were 3/16".

I then actually used the Tamiya drill itself to drill the holes (with tape wrapped around the dremel collet for the first hole). I used several progressively larger bits, starting with the smallest (the 1/32") I had then moving up to the 3/16" (which would not fit at all in the Tamiya, and had to go in my 'normal' drill instead.
Each hole was drilled slowly trying to keep it centered and as precise as possible.

I then trimmed the down to about a 1/4" in length. A little rough on the edges, but is is only the thickness of the spacer that matters at all.

Stupid phone camera didn't want to focus on the right end - but it fit nice and snug on the collet.

Collet and spacer fit nicely in the shaft

And voila! We'll see if it lasts or not.

If it doesn't last, then I can check to see if the Hobby Shop has some metal tubing that is 1/4" on the outside and 3/16" on the inside, and if I can't find it there - well I have a friend at work who has a huge machine shop who has said he can probably make a spacer in just a few minutes. (However he is travelling for work the next two weeks).
Because it is all fun and games . . .
But not always. Specifically, when pinning miniatures, faster is NOT better. Because faster results in more friction, which builds up heat, which expands metal, which then breaks bits (in the perfectly placed hole you are attempting to drill) which leads to anger, which leads to hate, which leads to suffering, which leads to horrible prequel movies.
However, not everything is better by hand either. As you get older (and that is something nearly everyone will do, like it or not (and it beats the only current alternative after all)) doing things completely by hand becomes more difficult.
I've found a handy little solution. The battery operated Tamiya 74041 Electric Handy Drill turns out to be just the thing. There is a nice web page (from a railroad modeler) that showed me how to do everything here.

Inside the slightly beatup, bubble wrapped box were three colored plastic sprues, and a small bag of metal parts.
The blue sprue was the shell for the tool, the orange sprue was the gears, and the gray sprue was the internal parts.


The sprues were clearly labeled for the parts.

The assembly instructions were all pictures and were fairly clear, though they did not necessarily do a good job in indicating sequence of assembly in a given section.
So first you put the batter contacts on the appropriate holder

Then click the motor into place


The kit comes with a small tube of grease (which appears to be petroleum jelly) - the instructions clearly show where to make sure you apply grease

the trigger pieces are assembled into the frame

This includes the chuck lock and trigger lock (which should be assembled before the trigger, as the trigger gets in the way of putting in the trigger lock.

The chuck lock is a metal button/pin that fits into a slight hole in the driveshaft to keep it from moving when you tighten the chuck. The trigger lock simply blocks the trigger from being pressed.

The gears go together easily, and when putting them into the handle it becomes obvious what goes where. All the gears get grease as well as the drive shaft.


The motor/battery contact the slips into place, and the bottom contact is held in place by another plate (that is held in place by the outside screws. Putting in the bottom battery contact was not obvious how it fit, and the trigger pin did not want to go into the place, but after a little work and a test fitting of the batteries it wasn't too bad, and it all worked first time!

The outer shell is held in place by four screws. These were tapping screws, so were a bit more difficult to get in all the way (yea for cordless screwdrivers)


It comes with two collets. Unfornately both of these are larger than I want to use, as like the 1/32" bits and wire for pinning.

There are a few of solutions to this. One is to wrap a bit of tape around the bit.

You won't be able to fit the tape into the front end of the collet, so slip the bit in through the back


This works ok for softer materials (like plastic).

However it doesn't provide a tight enough grip for anything harder (such as pinning metal).
A second solution is to get bits with a wider shaft than the bit. So instead of a 1/32" shaft you can get a 1/8" shaft for a 1/32" bit - these are available on eBay (I found them as low as $1.40 for 10 with free shipping from China here).

However I had just recently bought a couple of years supply of normal ones, so I wanted to still be able to use them.
I picked up a dremel 1/32" collet (part number 483) (ok, I actually picked up a set of collets and nut because my local Home Depot did not have the single one).

This fits the drill bit perfectly, however it doesn't fit the the drill spindle very well - so when using it it can wobble a little.
On solution here is to simple wrap the end of the collet with tape so that it fits the spindle better. It doesn't have to be an exact or tight fit, so this is adequate.
The other solution is to create an adapter ring. The web site mentioned that he made his out of scrap aluminum - I don't have any nor good metalworking tools.
 |
| from http://model-railroad-hobbyist.com/node/11404 |
I don't have precision measuring tools, nor even a bench clamp, but I think I did an ok job.
First I cut a working piece of 1/4" dowel (I only have about 4 feet, so not an issue (and yes, I had to do it twice to get one that worked)).

I then actually used the Tamiya drill itself to drill the holes (with tape wrapped around the dremel collet for the first hole). I used several progressively larger bits, starting with the smallest (the 1/32") I had then moving up to the 3/16" (which would not fit at all in the Tamiya, and had to go in my 'normal' drill instead.
Each hole was drilled slowly trying to keep it centered and as precise as possible.

I then trimmed the down to about a 1/4" in length. A little rough on the edges, but is is only the thickness of the spacer that matters at all.

Stupid phone camera didn't want to focus on the right end - but it fit nice and snug on the collet.

Collet and spacer fit nicely in the shaft

And voila! We'll see if it lasts or not.

If it doesn't last, then I can check to see if the Hobby Shop has some metal tubing that is 1/4" on the outside and 3/16" on the inside, and if I can't find it there - well I have a friend at work who has a huge machine shop who has said he can probably make a spacer in just a few minutes. (However he is travelling for work the next two weeks).
Because it is all fun and games . . .
Your blog is really very nice informative and thorough. I read the blogs each time they are sent.
ReplyDeleteShipping From China To Amazon FBA