Wave three of The Walking Dead: All out War takes it's title from volume 2 of the comic collection - Miles Behind Us. It tells the story of Rick and his group of survivors coming across the Greene family farm, which introduces many of the major characters, and throws some new twists into the story and the game.
With this wave, Mantic has continued with it's new line of MDF scenery for the game. Their first MDF kit was
Dale's RV, and now they have the barn, tractor, fences and hay bales for the Greene family farm.
The first part are four resin hay bales. These are all the same, and make for a nice 3d version of the card tokens that come in the expansion.
The MDF comes in 9 sheets (2 very thin white ones, 7 'normal' ones).
The sheets are even numbered to help identify the parts on each. The white ones are the outer roof pieces
Then you have the floor and some of the fence pieces
More fences
Fence bases, and one of the side walls
Roof joists and the back of the barn
More joists and the front of the farm
The other side wall
The final sheet is for the tractor.
Looking at that sheet - well I am vary thankful that the MDF kits come with instructions on how to build these.
Instructions for their models is one of the things that are unfortunately lacking in their kits. They have contracted with
Sarissa Precision LTD to manufacture these, and I'm impressed enough to check out some of their other kits.
However, even with instructions some of this can be a little challenging for newcomers. Plus the instructions all refer to part numbers, and I was not able to find any numbers on any of the sheets.
First up is the barn itself. To help with your construction, I'm attempting to show each piece on the sheet that is comes on, as some are not always as obvious as they could be.
 |
| the floor |
 |
| one side |
 |
| the other side |
I believe both sides of the barn are identical. They go in the floor with the small tabs down, and the wood grain on the outside. It might be easier to actually glue all four walls together and then glue them to the floor - I found that I had to lift the walls up a bit to fit the front and back on.
 |
| in place |
Then we assemble the back and front of the barn. You will notice on the floor there are two small round holes at one end. This is the front, and where the doors will go. The back does NOT have the doors (obviously).
 |
| back |
 |
| in place |
 |
| front |
 |
| in place |
Next comes the back trim. This is a very thin piece, so be careful removing it.
 |
| back trim |
It then fits VERY tightly to the back - after dry fitting it I had to pry it back off with a knife in order to glue it.
 |
| in place |
Then come the supports for the hay loft. These are in the center of the hay loft, and are thin pieces set with a 90 degree angle. There is a decent size piece of scrap between each pair, don't worry about the scrap as you remove the pieces.
 |
| hay loft supports |
There are six supports
 |
| scrap and supports |
These fit into the floor and walls of the barn, three on each side
 |
| first support |
 |
| all six supports |
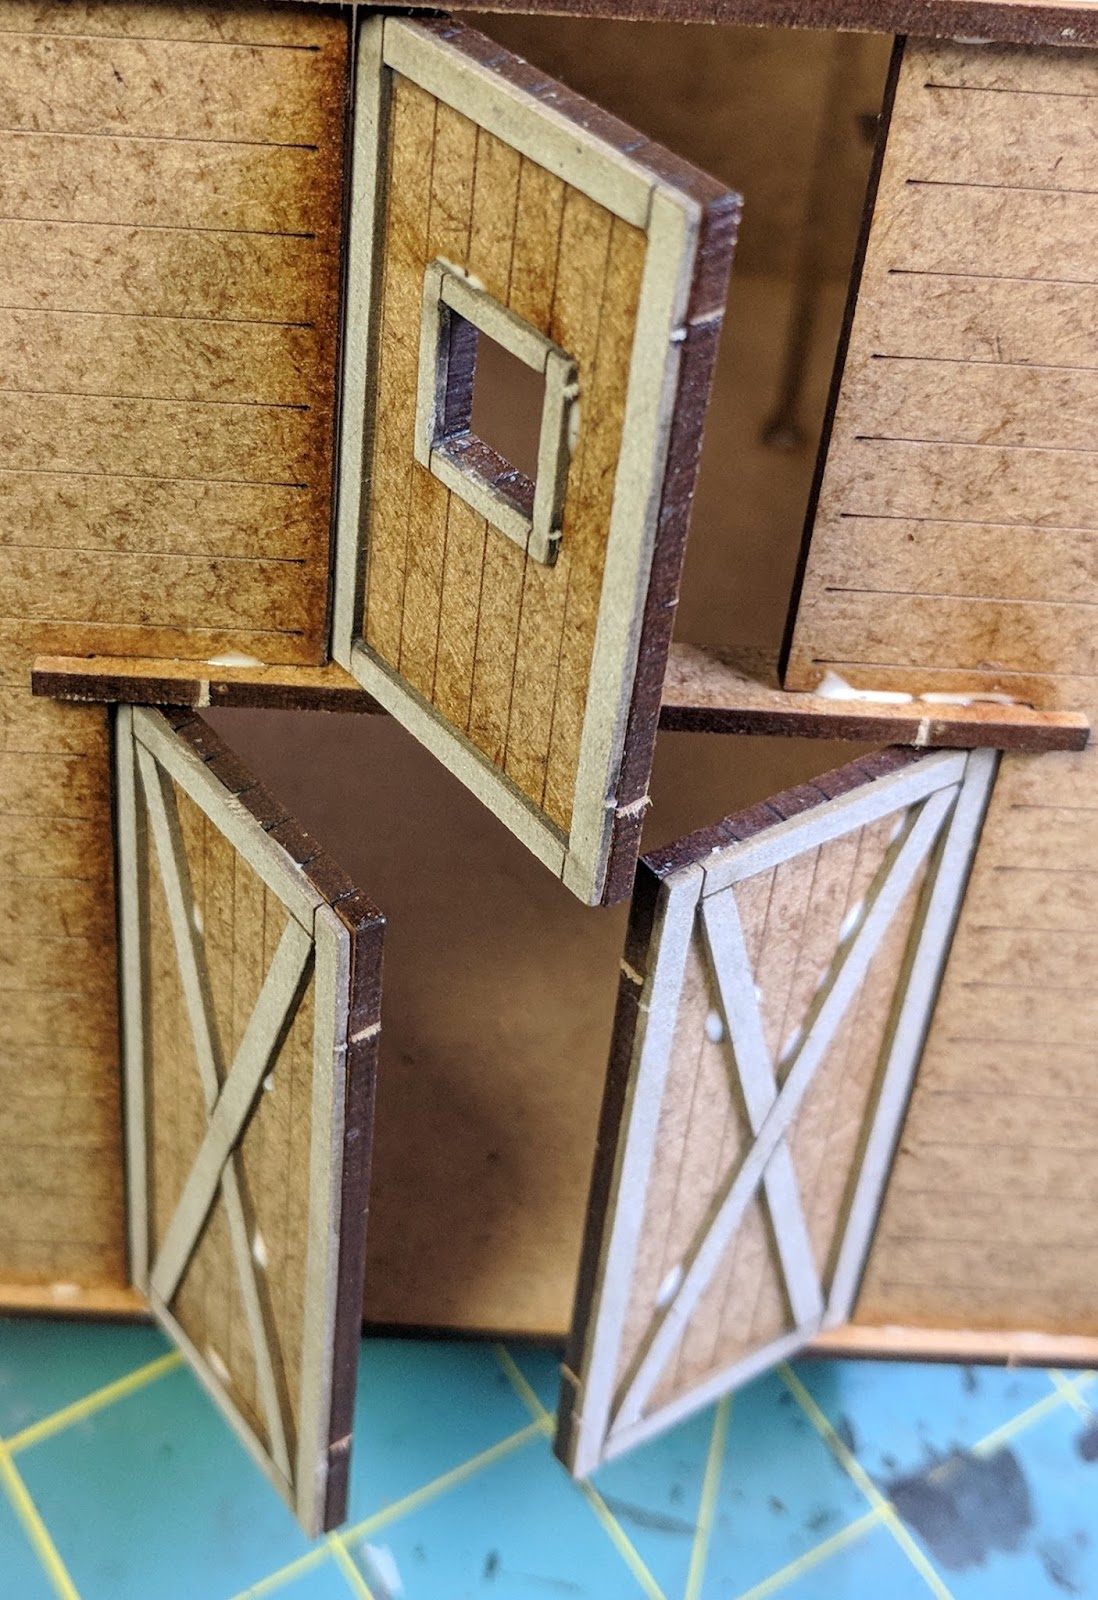
Next we are ready for the doors. These are the NOT scrap from the front of the barn. They basically fit where they go, but need some support to actually open and close.
 |
| doors on this sheet |
 |
| doors off the sheet |
The doors also use the white trim sheets. There are four pieces (two on each) that fit on the top and lower doors
 |
| top door trim |
Simply glue the trim to the doors (on the textured side, of course). It fits very well.
 |
| top door with trim |
 |
| bottom door trim |
 |
| all doors with trim (the right and left lower doors are on the wrong sides in this picture) |
In order to install the doors, we are going to put in a piece of trim that has a hole for the small knobs in the top and bottom side of the doors. The shorter piece with three holes is for the bottom, the larger one (the same size as the back trim) is for the top.
 |
| door trim |
The trim fits very tightly, but you want to be careful not to get glue in the holes for the doors, as these are basically the hinges. Unless, of course, you want to glue your doors closed - but who wants that?
 |
| test fit the lower trim piece. You can see how the pairs of holes for the large lower doors pair up. |
 |
| only put glue here, where the trim actually touches the barn |
I found the easiest way to put this together is to put the bottom tab in the bottom hole, then angle the door as you bring in the trim piece, straightening it up as the trim fits into place. Do this first to one side, leaving the other sticking out, then do the other side.
 |
| one door first |
 |
| then the other |
 |
| until both slip into place |
Doing this should allow both doors to open and close freely
 |
| doors open |
Then do the same thing with the long piece of trim. Put the bottom tab into the lower trim, then angle the door as you slide the trim into place
 |
| doors open |
 |
| doors closed |
 |
| and open |
The hayloft just lays onto the supports inside.
 |
| hay loft |
 |
| installed |
Next you need the three roof beams and three pieces of the support frame.
 |
| Mid support frame and two roof beams. End frame pieces are on sheet 6 |
 |
| third roof beam |
The beams fit snuggly - first slide the middle slots up into the slots of the middle support frame. They only fit one way - if it is difficult you are doing it wrong.
 |
| matching notches |
 |
| in place |
Then slide the end support frames onto the ends of the support beams
 |
| and the frame is done. |
Next you add the card panels for the roof.
The roof pieces need to be scored so they bend on the center. The card is fairly thin, so you don't want to cut too much. I find that the easiest way to do this is use the BACK of the hobby knife blade. Pull it down the center line much like you were cutting it, but the thick, dull back of the blade will instead mark the card but not be able to cut all the way through it. Be careful and don't forget that the sharp part of the blade is now pointing up - so you don't want to touch it or put pressure on it, only the handle.
 |
| scoring the roof panel |
Once you have scored the panel, you should be able to bend it along the score line - enough to match the roof support frames. First put a thin line of glue on the top of one side of the support frames and the beams, then press one end of the support frame into the roof panel flat. Next roll the support frame slightly, until the tabs fit into the notches.
 |
| pressing on one side |
You will want to clamp this together, as the panel can want to open up (depending on the depth of the scoring). Luckily it doesn't take long for white glue to set.
 |
| clamping the roof into place |
You can then do the same thing on the other roof panel, and set the whole assembly aside to dry
I wanted to see exactly how well the 3d building fit the card one that came with the expansion. The building is slightly larger than the one printed on the card, but smaller than the full card. I find it a little interesting that the card has the doors on the sides while the building has them on the end. I haven't had a chance to go back and check the scenario(s) using the barn to see if that changes anything or not.
 |
| comparing the sizes |
 |
| slightly larger than picture, slightly smaller than card |
Once dry, the roof simply sits on top of the barn. And with that, it is complete.
 |
| front |
 |
| left |
 |
| back |
 |
| right |
 |
| inside |
The kit makes more than just the barn. It also makes six fence pieces. These are very easy to put together, but you have to take a little care to cut out the thin fence pieces.
So you start with the bases
Then the fence posts. Be careful and cut these out with a hobby knife, because there are marks cut into them for gluing the fence pieces on them. (Unfortunately these marks are a bit deeper than they should be, so can weaken the posts if you try to pop them out.) There are six pairs of inner posts these. The inner posts have support on either side, while the end posts only have support on one side.
The outer posts come in three sets paired up side to side and end to end.
Finally the fence pieces are a big block of 12 thin strips. In addition, there are some extra strips of different sizes if you want to use them for broken fences.
Start by gluing the outer fence posts to the slots on the ends of the bases, with the support pointing inward. Make sure that the marks on the posts are all on the same side of the fence.
 |
| fence end posts |
Then glue two inner posts to the holes in the base, again making sure the marks are all on the same side.
 |
| added inner posts |
Next glue two fence pieces to the four posts using the marks as guides. I found that none of these sat perfectly in line - so I clamped down either end of the fence.
 |
| glue on the marks |
 |
| fence pieces on the marks |
 |
| clamps on the fence pieces |
Let the glue dry, remove the clamps and you are done. Make some fences broken to reflect that it can be hard to find time to make repairs during a zombie apocalypse!
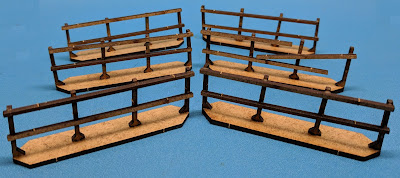 |
| fences |
Of course, I want to compare the models to the card terrain.
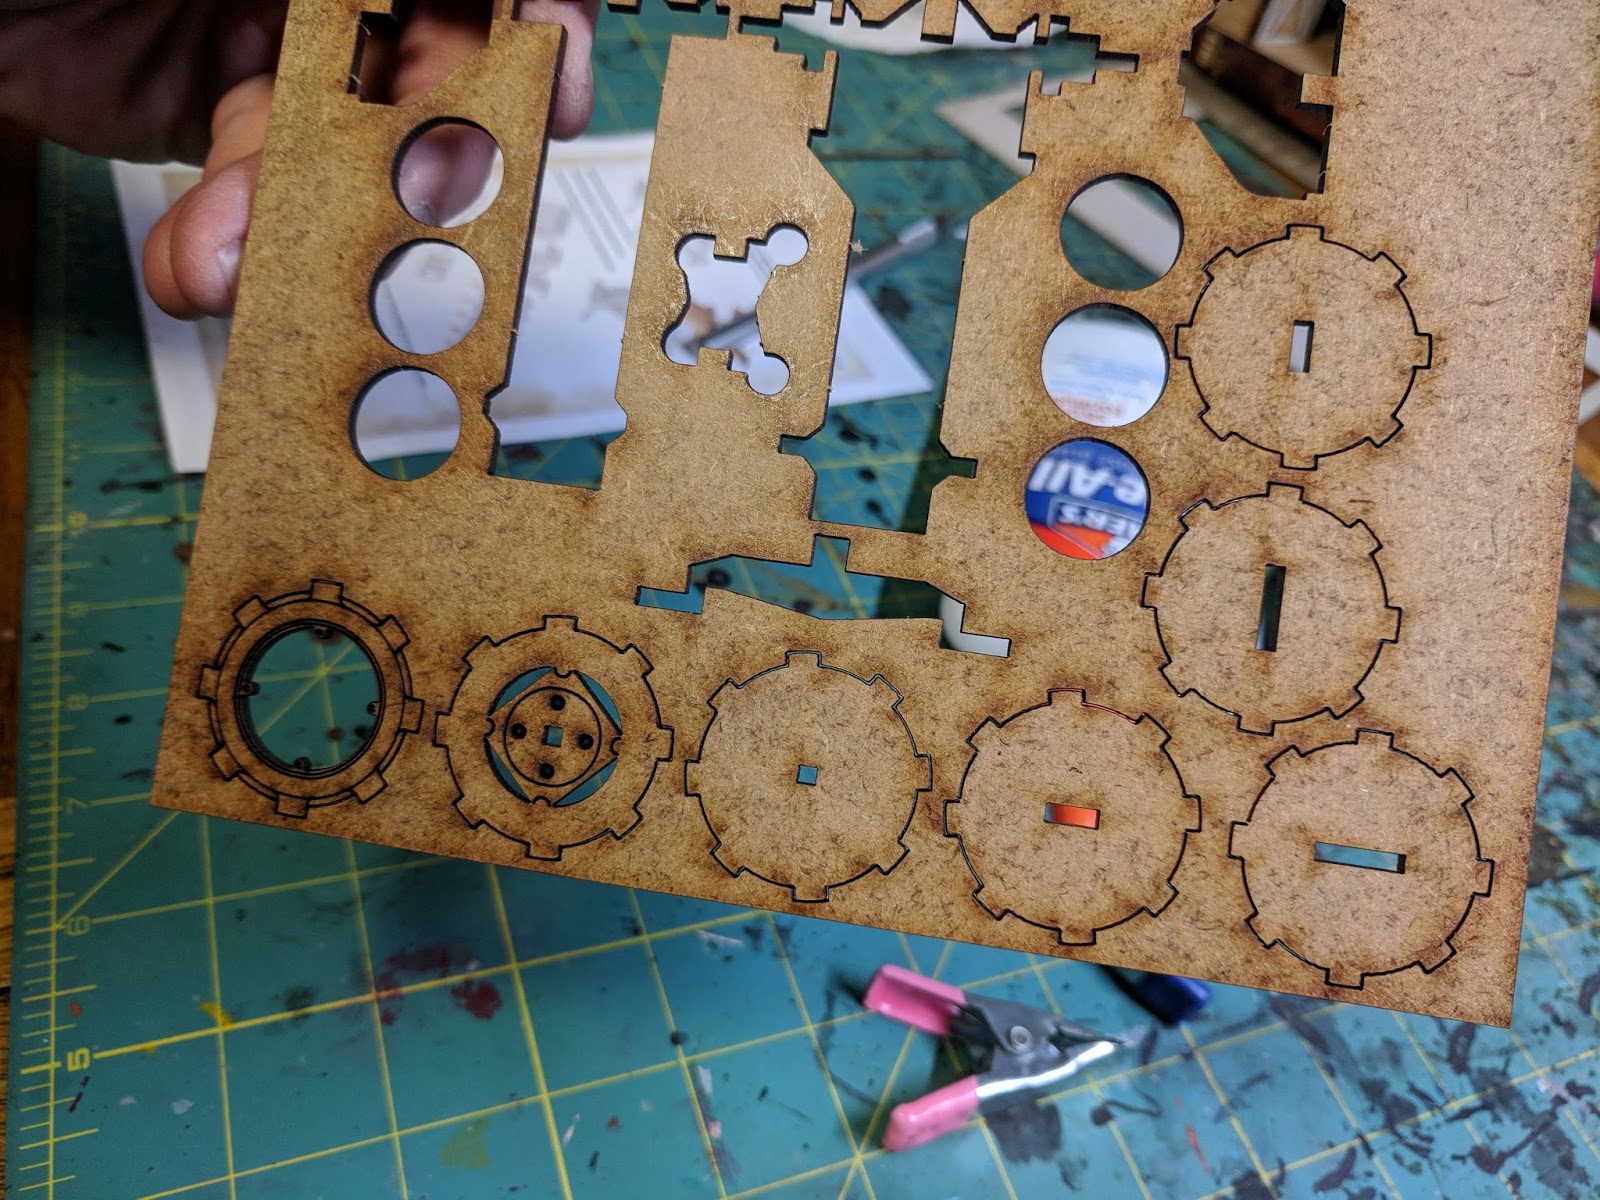
Looking at the mdf sheets, and even the instructions, the tractor is the most complicated of the models in this kit. Without the instructions it would be near impossible to figure it out (as compared to the fences or barn).
So start with the two chassis pan panels, and the front wheel axles.
The smaller pan piece goes on top of the larger one. Line up the rectangular holes and ends. This is important because other pieces fit in these holes, so if you get them out of alignment then you will have problems later. The front axles then fits into the end of the large rectangular slot on the bottom of the larger pan piece.
Next punch out the air filter
and glue the two halves together,with the etched sides facing out.
While that is drying, glue the two center engine panels together
These are nearly identical except for some of the slots. There is one slot that goes through both pieces - make sure this lines up.
Next glue the air filter to the bottom of the chassis pieces, with the circular piece on the port side. (For those unfamiliar with nautical terms - port is the left when you are facing the front of the boat (I remember it because port and left are both short, while right and starboard are long)). It actually works pretty well when describing the orientation of any vehicles.
Once those pieces are set, then fit them into the pan panels. The hook in the front fits into the large slot (where the axles were glued in earlier). The back end hooks between the triangular pieces at the back of the pan. Then slide it forward until the tab on the engine panels fits into the hole on the front axles.
 |
| after it is in place, from the bottom |
 |
| from the top side |
Now we add engine parts. There is a large part with the smokestack and a oval attachment - this goes on the port side of the engine.
A similar part with a rectangular attachment goes on the starboard side.
When adding these pieces, again be sure the rectangular hole lines up.
Next add details to either side. There is an oval piece that goes on the port side, as well as a rectangular piece with two tabs that fits into the two lower slots on the port side.
 |
| note the rectangular hole going all the way throuth |
There is a square panel with four cutouts in it - again line up the slot and glue it on the starboard side.
Next to the rectangular detail piece is a longer piece, with a rounded, hooked top. This is the piece that goes all the way through the engine, with the rounded top poking out port side, and the small tab on the end poking out of the starboard side.
 |
| poking in a bit, trying it on for size |
 |
| and sliding it all the way in - a perfect fit |
 |
| so tight, it barely needs glue |
Now glue on the engine cowling panels - making sure the etched detail is on the outside (which makes me ask why are the marks on the fence posts were so deep instead of using this type of thin detail line?).
 |
| starboard cowling panel |
 |
| port cowling panel |
 |
| starboard side with cowling panel |
 |
| port side with cowling panel (and my complete inability to keep all of my hand out of the shot - because the concept of just holding the front end seemed to be completely beyond my grasp (which was busing holding the entire model) |
Next, add the inner rear wheel guards. The angled portion faces the front.
 |
| starboard rear wheel guard |
 |
| port rear wheel guard |
The bottoms of these should be flush with the bottom of the pan panels, around the back end of the rear axles.
I preferred to put the wheels on before adding the rear guards (though the instructions say to do it now). I also waited to add the outer engine cover until later as well - at first thinking it might be easier to paint without it (though I finally decided to go ahead and put it on).
Next, we assemble the front wheels. These are build directly on the axles. Each front wheel has three pieces - the inner wheel, the spokes, and the outer rim.
 |
| the inner wheel goes on first |
 |
| the spokes go on next, glued to the axle and the inner wheel. |
 |
| then glue on the outer wheel rim, making sure it lines up with the outside of the wheel. |
 |
| then do the other side |
The rear wheels work the same way, but have six layers instead.
The rear wheel pieces are broken down by the size of the slot in them (which matches the rear axles). There is one inner piece with the widest slot, two mid wheels with medium slots, a wheel with a square hole, then the outer wheel and finally the rim. These go together just like the front wheels.
 |
| inner wheel, flat against the rear guard |
 |
| mid wheel, medium slot, flat against inner wheel |
 |
| second mid wheel |
 |
| square peg wheel, again flat and glued to mid wheel |
 |
| outer wheel |
 |
| rim. Match the log nuts to the markings on the outer wheel and make sure it is aligned |
Then repeat for the other rear wheel. Next add the headlamp panel to the front lugs.
Now is time to put on the outer engine cover and the rear guards. Of course the engine cover is a picture I am missing.
Score the sides and back of the cover on the lines. Then fold down the sides and back (the back goes at an angle). The cover fits over the engine with the exhaust going through the hole in the cover. This will need to be clamped to hold it down. While this is drying, assemble the steering wheel.
 |
| careful - it looks like trash |
The two circles on the card with the engine cover are the steering wheel, and the tiny square peg is the center. The smaller circle is on top of the larger one, with the square peg going flat against the small circle but sticking out from the large one. This is then glued in the small hole in the back of the engine cover.
 |
| my focus wasn't that great |
Next glue the seat in place - the curved portion facing the back and detail facing up.
 |
| seat |
Then add the card rear guards. The larger tab fits the top, the smaller near the back, and the detail facing up. These (ideally) should sit just above the rear wheels (but if they touch no one will really notice but you).
The final pieces are the exhaust disks. These four disks fit over the exhaust and sit flat on the cover - the exhaust will stick up above them.
And the tractor is done!
 |
| Port |
 |
| rear |
 |
| starboard |
 |
| front |
Of course, I had to compare the model to the card terrain that came with the expansion. I think that even though I would want to play with the model, I would keep the card on the board to mark the edges to simplify game play.
Oh, don't forget the hay bales. The only work they require will be a bit of cleanup on the bottom. These are definitely smaller than the card, so again I would use the card with them.
However when talking scale, it doesn't really matter how it looks against pieces of cardboard - what is important for models is how they scale to other models. While I should be using Herschel for these pictures, I've only had him for about seven months - so of course he isn't painted. Rick and Shane and a few walkers will have to stand in instead.
First up - the tractor v the wrecked sports car. Now that I write this, it would be more accurate to do the pickup - but that would mean going back downstairs, digging up one of the pickups, setting up the camera - and I'm too lazy to take the five minutes to do that at 11 pm at night.
 |
| Car v Tractor |
 |
| fence |
 |
| hay bale |
 |
| and the barn (ok, so Shane is the correct one here, opening the barn). |
And to leave you with one final shot of Dale on his RV parked next to the barn with the tractor in front and a fence and hay bale.
 |
| ok, all TWD:AOW terrain pieces together |
So another nice MDF terrain kit. Of course the prison is already out, and Woodbury comes out next month, so there is no shortage of awesome 3d terrain to use for your games.
Because it is all fun and games . . .


Awesome work in the review and writing, thank you for your work and for sharing. A lot of pieces... not easy to assemble but looks fantastic.
ReplyDelete